Hello !
Today I would like to share with you a simple technique to help you better visualise in 3D. We’ll go through the basics of perspective to draw ellipses in 3D, then cylinders.
We’ll go straight to the point, so I recommend you to get started by downloading the Designer Starter Kit first.
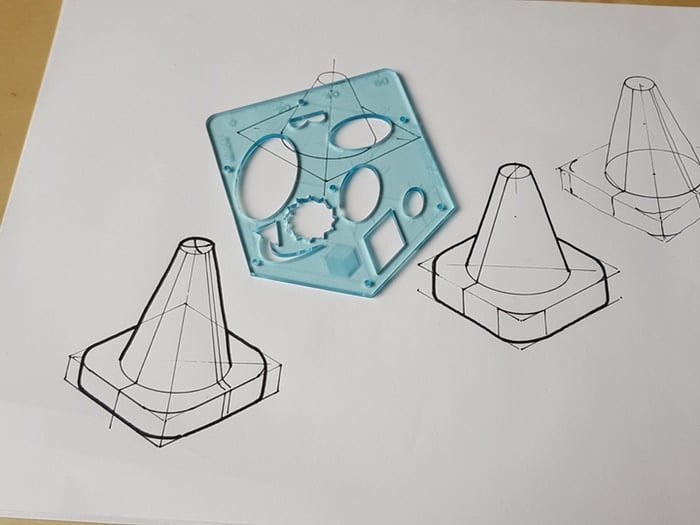
How to Draw Cylinders in Any Angles with the “Packaging Box” Technique
Drawing cylinders in perspective can be challenging, especially when trying to capture them accurately in any angle. In this tutorial, you’ll learn a simple yet effective technique called the “Packaging Box” method to visualize cylinders in 3D with ease.
Why Use the Packaging Box Technique?
The Packaging Box technique helps you break down the cylinder into a simple 3D box shape first. This box acts as a guide for positioning and orienting the cylinder correctly in perspective. Once the box is established, drawing accurate ellipses and cylinder forms becomes straightforward.
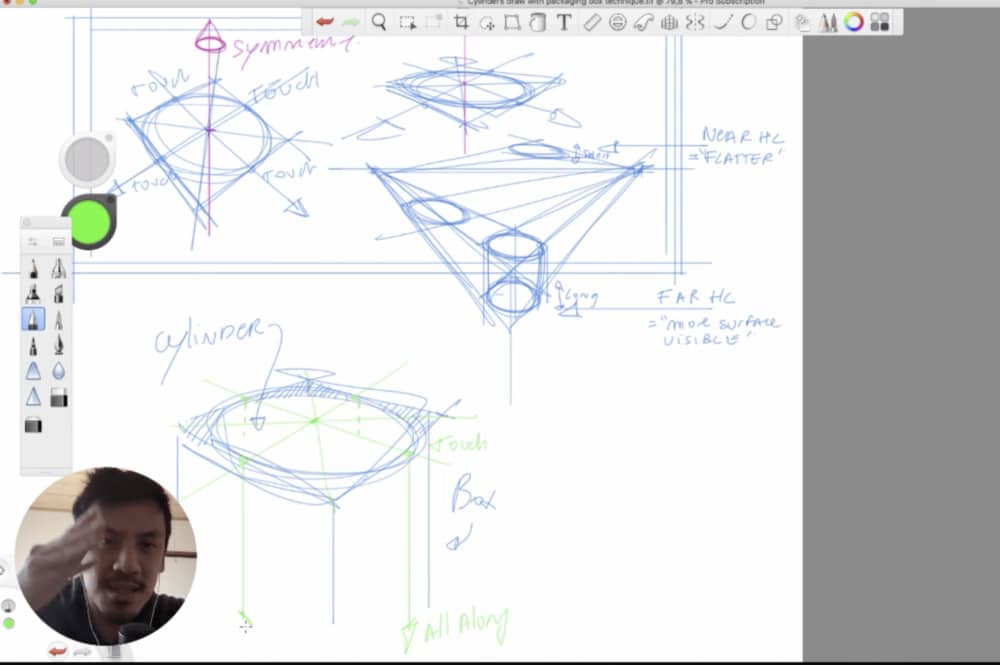
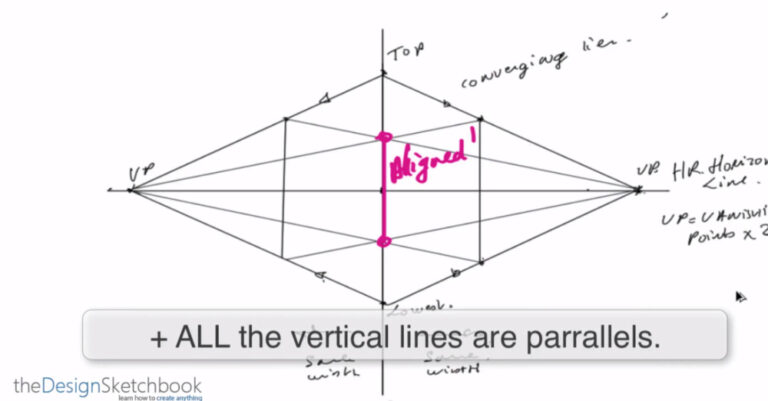
Step 1: Understand the Basics of Perspective for Ellipses
Before drawing cylinders, it’s essential to grasp how ellipses appear in 3D perspective. Ellipses are the top and bottom faces of the cylinder, seen at different angles depending on the viewer’s point of view. This method shows how to construct these ellipses within the context of the packaging box.
Step 2: Draw the Packaging Box
Start by sketching a rectangular box that contains your cylinder. This box represents the bounding volume of the cylinder and helps anchor the ellipses in space.
- The box’s dimensions determine the height and diameter of the cylinder.
- Use perspective lines to ensure the box aligns correctly in 3D space.
- The box helps you visualize rotation and tilt of the cylinder in any angle.
Step 3: Draw the Ellipses of the Cylinder Inside the Box
Inside this packaging box, draw the ellipses that represent the cylinder’s circular base and top.
- Position the ellipses exactly on the top and bottom planes of the box.
- Use perspective guidelines to shape the ellipses correctly.
- These ellipses follow the tilt and orientation dictated by the box.
Step 4: Connect the Ellipses to Form the Cylinder
With the ellipses in place, connect their sides with smooth vertical lines to form the curved surface of the cylinder.
- Make sure the vertical edges are parallel following the box’s orientation.
- Refine the contour to create a natural cylindrical shape.
Bonus: Practice and Applications
This method can be applied to product design sketches, industrial design concepts, or any drawing that includes cylindrical shapes like cans, tubes, cups, and packaging. Mastering this technique aids in visualizing and sketching 3D objects confidently.
For those interested in improving their drawing fundamentals, I recommend downloading the Designer Starter Kit, which offers additional resources to enhance your skills.
Have fun exploring this simple yet powerful method to draw cylinders in any angle!
Cheers,
Chou-Tac
Related Articles


Add comment