Question from Nur Aktas
Industrial design student, Turkey
As a designer, how do you present your product to the company?
As a designer when you present a project to your company (or a client), we don’t straight away present a final project. We set up few meetings in advance to build the project TOGETHER.

When presenting a project to your company (or client), don’t jump straight to the final concept. Instead, plan a series of meetings to build the project together.
Why? To ensure the company and design team share the same vision. This avoids spending weeks on a direction that doesn’t match expectations—saving time, money, and team morale.
We use a system with five creative phases, each ending in a validation meeting. These checkpoints keep the project on track and prevent it from getting lost in a “creative loop.”

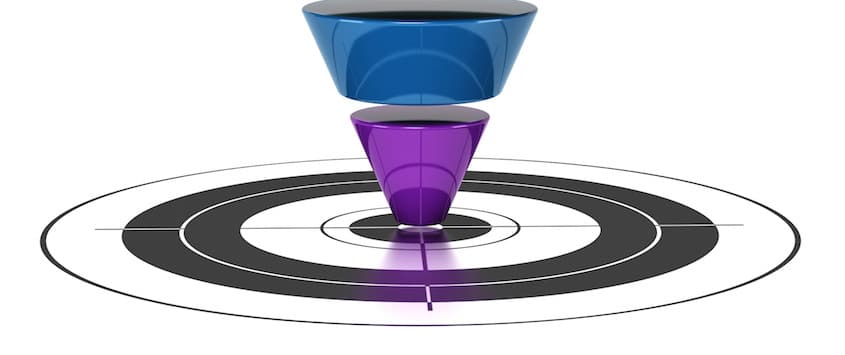
Design process = Funnel
Think of it like a funnel: Start with many ideas, then narrow them down step by step. The earlier you make changes, the cheaper and easier they are.
TIP from LCapital (LVMH Group): Even after validation, changes may be needed. Early adjustments cost nothing but a good conversation and a few sketches. Later changes can affect multiple departments—prototypes, materials, marketing—so act early!
The 5 phases of creativity
Phase 1 | Design Brief
The brief usually comes from the design or marketing team. Ask questions to gain clarity—it sharpens your direction and avoids misunderstandings.
Validation Meeting #1: Confirm alignment between the brand, customer, and project.

“Validation” meeting n.1
Phase 2| Wide research
At start, the research is super wide. We look for the widest variety of proposals and innovation. We mainly take inspiration from the users, there habits, needs, way of living… identify there problems and look for innovative ideas. If an idea looks crazy, then great ! You look for provocation.
It’s easier to drag a crazy idea to something more down to earth than the inverse.
I remember reading somewhere why Japanese are so innovative. They believe that “Every problem is a treasure”. What does it means ? instead of avoiding problems, look at how to solve them. There is an opportunity to give value to the world.
“Every problem is a treasure.”
Time is limited. The priority is given to ideas, not on quality of sketches or presentation. The very first batch of sketches won’t be shown to anybody except yourself and your design team if you want to. You don’t bother about nice drawings, or even perspective. Just drop IDEAS in your sketchbook. You will mature some of them only if they deserve to be carried on further.
Don’t waste time at making nice drawings. The variety and creativity of ideas count FIRST. If you spend too much time at making nice drawings, you will have less time to create…
The final shape doesn’t matter much at this moment. We care more about the function, the architecture of the product, the way people will use the product, the proportion, the usability, the user’s emotion… I recommend you to illustrate your ideas with people using your ideas. Many designers forget to do that. Your audience may not be all designers. They will highly appreciate these quick “staging”.

“Validation” meeting presentation n.2
You don’t want to bother much yet about feasibility.
You propose diverse ideas and a start of various axis of research with quick sketches supported by mood boards (pictures of users, source of inspiration pinned on a board).
Together you will define few axis of research.
Phase 3| Axis of research
Previously, we looked for getting a wide scope of ideas. Now, it’s time to start focus on a limited number of axis and spend more time on getting deeper research. You refine the sketches, you get deeper into the functions, shapes maybe colours… Then you present your multiple ideas to the team and discuss. Make sure that each axis present there own major specificities.

“Validation” meeting presentation n.3
Each axis is more consistent. Feel free to recommend the axis you feel the most appropriate.
At the end of the meeting, 1 axis should be selected.
Phase 4| 1 axis > 3 proposals
From the selected axis, you have a clear direction. At this stage, you start getting into the details and more defined shapes. And because we like variety, you will create 3 proposals. You may consider this format:
- The safe proposal (Commercial)
- The daring proposal (Most innovative)
- A risky approach that you personally feel cool enough to be presented

“Validation” meeting presentation n.4
You propose 3 options. Each proposal is presented in separate boards. It’s pretty good to start presenting your board neater with a good quality of rough. You may use computer to make neater presentation, but yet, no advanced rendering.
Phase 5| Refinement and Ultimate validation
“There can be only one !” – Highlander.
Your proposal is selected ! Awesome. Time for refinement.
Designers give more accurate technical drawings* and can start to make a first model or prototype. It can be a clay model, a first sample of shoe, a 3D printed model…
We make sure that
- the line we draw on paper looks as good as we wanted in volume
- the measurement and proportion are correct
- do a preliminary test of the product about ergonomics, functionality (some “DIY models” can be made in previous phases)
- we make the necessary refinement.

“Validation” meeting presentation n.5
Remember to include the mood boards (users, brand, spirit of your products…) to support your project. You provide 2D render (eg. Photoshop sketches, Illustrator) or 3D rendering (eg. Rhino 3D, Solidworks) and some additional technical drawings if needed. You present them with a speech and professional presentation board. Once again, present the product with people using it. It makes the concept clearer bringing life to your Prototype.

Hope it helps you to see clearer of the creative process and the different elements to present along the way.
Once again, this may vary more or less. But that’s pretty much the guideline. If you have any question, feel free to ask in the comments below.
See you for the next TIP !
Cheers,
Chou-Tac
Learn more about Design Portfolio


“If an idea looks crazy, then great ! You look for provocation”. this made my day ,coz I have many crazy ideas . Thanks Chou Tac
This answers my question
Hey Joe,
That’s definitely great that you push the boundaries ! : D
Hi, I really enjoy your tips for the day. I’m an aspiring Footwear designer that is interested in starting my own line. I found this post really helpful, and I would really appreciate if you can do a tip on technical drawings. It’s one area that I don’t have much experience with and would like to learn more about.