


No more doubt about how to start your sketches.
Today, I decompose my sketching tutorials into bite-size steps.
You learn the “Lego Block Technique”
It is essential to learn how to draw with simple techniques
to progress fast and draw with efficiency.
This is how your mind gains clarity, and you increase your skills like crazy!
Unlock Your Creative Potential with the LEGO Block Technique
How to Draw an Apple Plug (with the LEGO Block Technique)
Today, we draw a plug design by APPLE.
And you learn the Block Sketching Technique.
Study it and it will open in front of you a door
with an infinity of Product sketching possibilities!
To follow this tutorial,
you need to go through the Designer Starter Kit book first
to learn your basics of perspective.
>> Subscribe to my Youtube Channel
>> Get the Designer Starter Kit
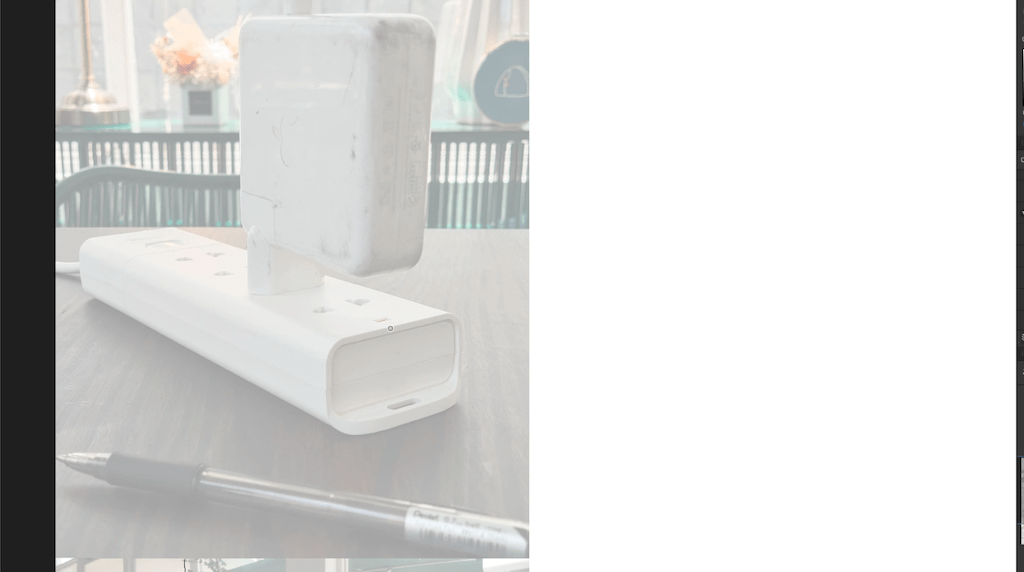
I went to a cafe with my laptop and saw my Apple plug standing.
And thought it would be a great sketching tutorial for you today!
You learn how to start drawing anything easily.
How? By decomposing something complex into simple blocks.

Remember to subscribe to my Youtube channel to get notified of the newest design sketching tutorials.
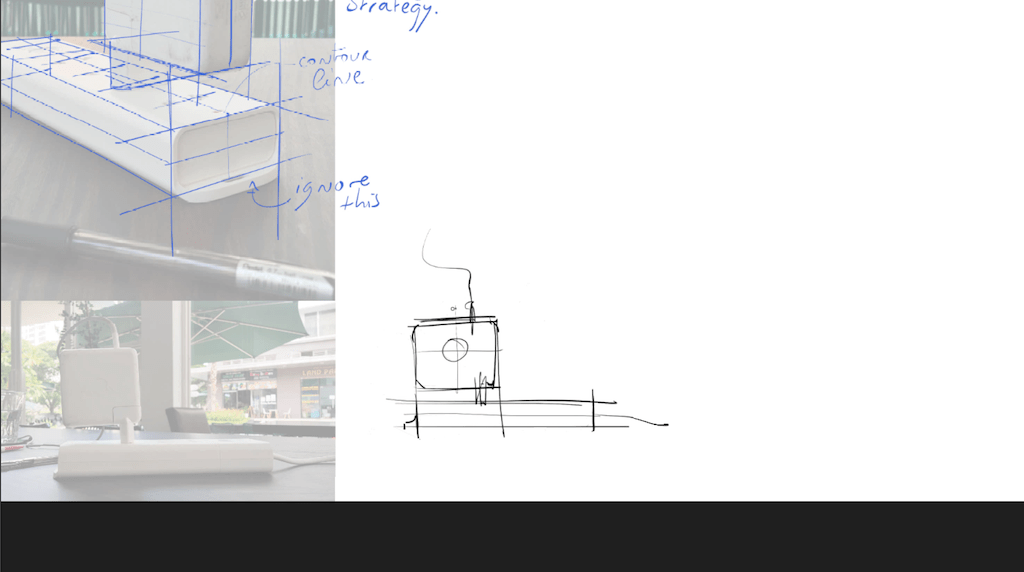
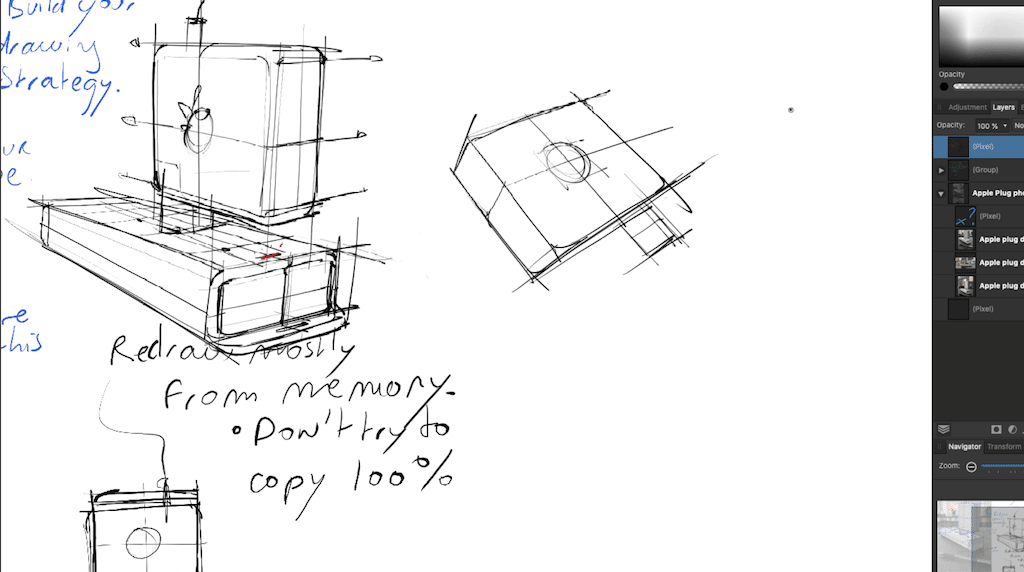
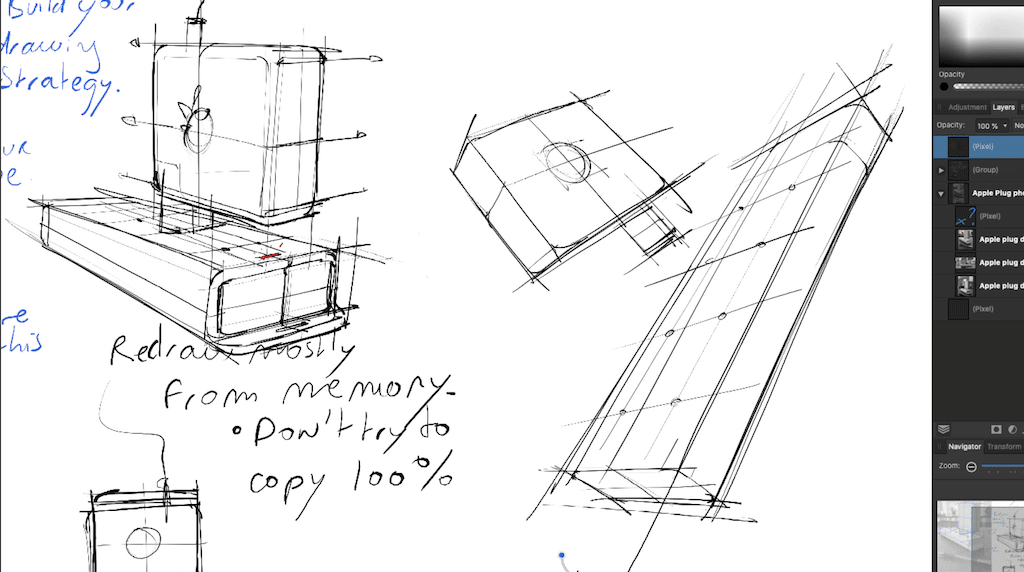
PHASE 1| Strategy in 2 dimensions
- Observation: Start by observing the Apple plug from the side view. Align the elements in your mind.
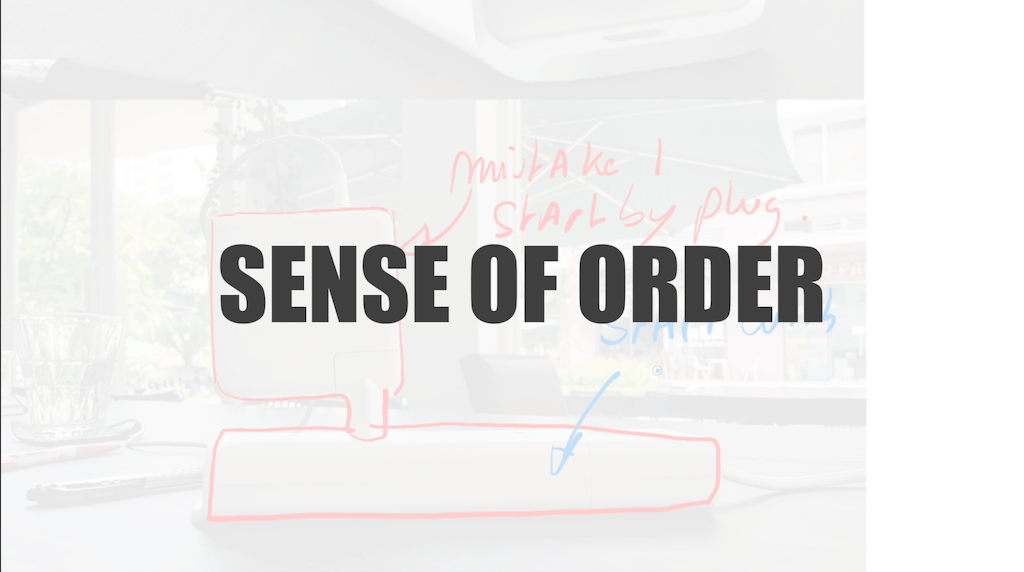
- Avoid Common Mistakes:
- Mistake 1: Do not begin by drawing the plug itself. Instead, strategize and set up a sense of order.
- Mistake 2: Avoid drawing only outlines which can lead to clumsy sketches. Instead, think in terms of blocks.
- Draw the Base First: The base supports the plug. Draw this first to establish perspective and order.
- Think in Blocks: Simplify the complex subject into simple geometric forms. Instead of outlines, think about geometrical shapes.
- Utilize Geometry: Sketching involves a series of simple rules of geometry. Assembling these rules helps in drawing complex forms.
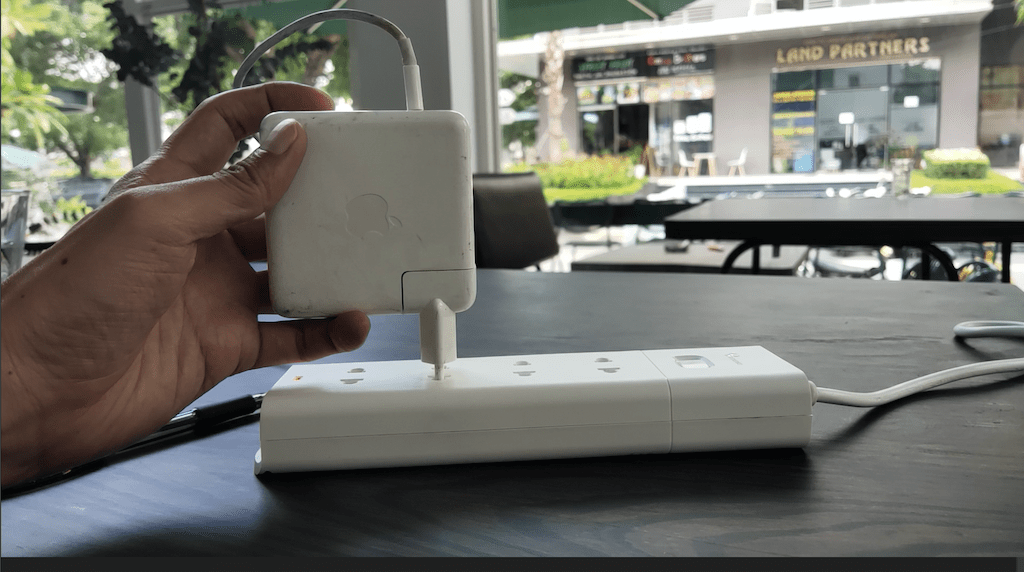
Observation from side view, where the elements are aligned.

Beginner’s mistake 1 is to start by drawing the plug itself.
I don’t recommend you to pick randomly the element to start with.
Try to draw with strategy and set up a sense of order.
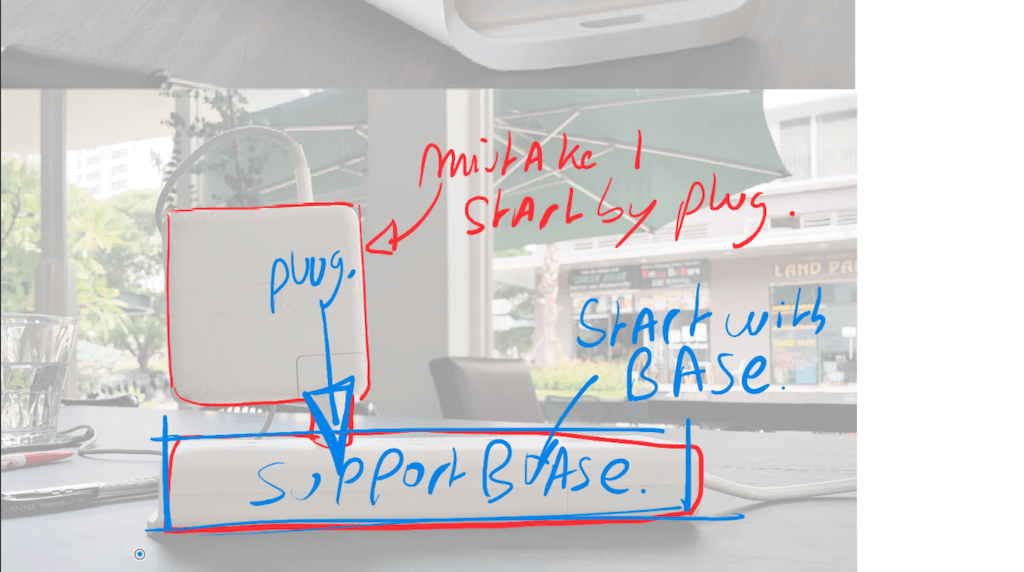
The base is what supports the plug itself.
We should start to draw it before the plug that will connect to it.
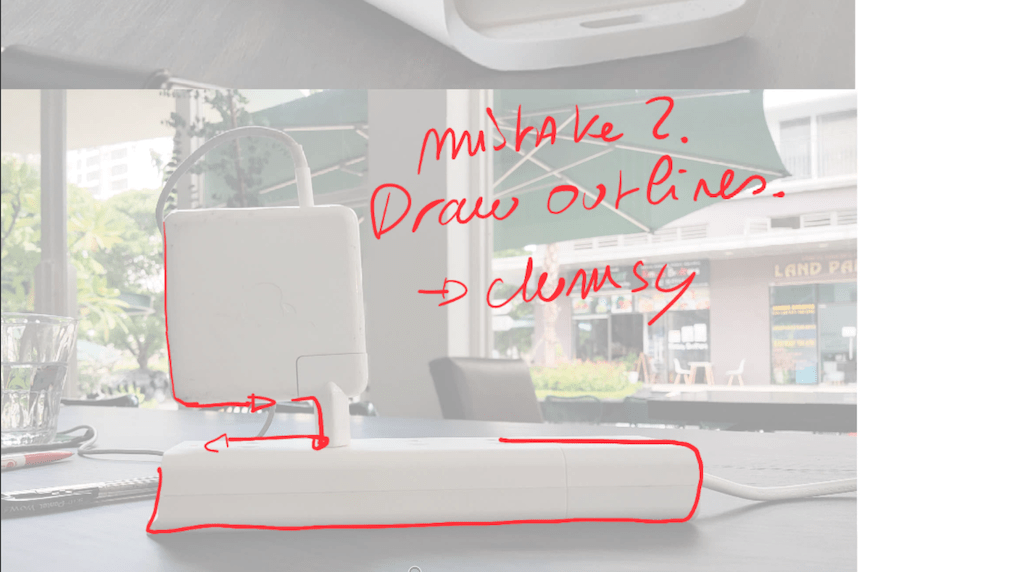
The beginner mistake 2 is to draw what you see using only the outlines.
It often results of clumsy drawings.
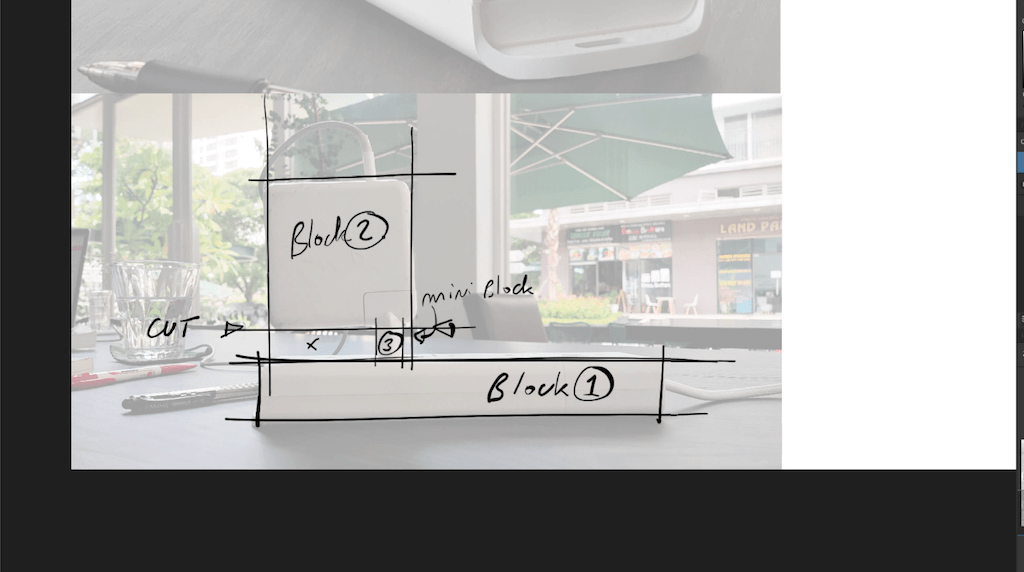
When you draw with strategy, we think with blocks/boxes.
It helps us to simplify a complex subject into very simple forms.
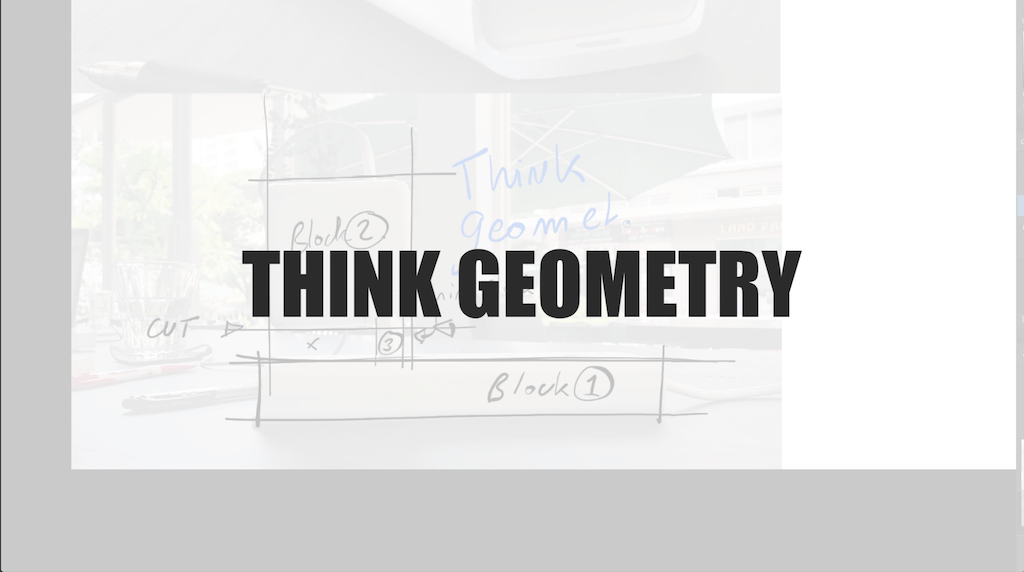
Instead of thinking with outlines, you think with geometry!
You would be surprised how sketching is actually made of a series of simple rules of geometry.
The learning curve raises when you start to assemble these rules to draw complex forms.
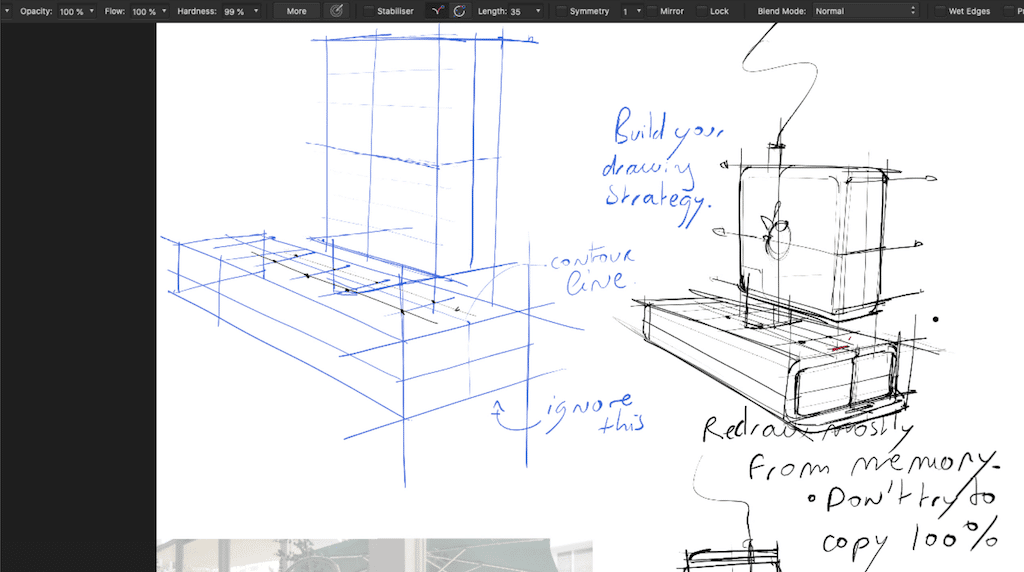
PHASE 2| Practice in 3 dimensions

- Transition to 3D: Move from the 2D side view to practice perspective drawing in 3D.
- Use Underlay: Use photos as an underlay with reduced opacity to guide your drawing.
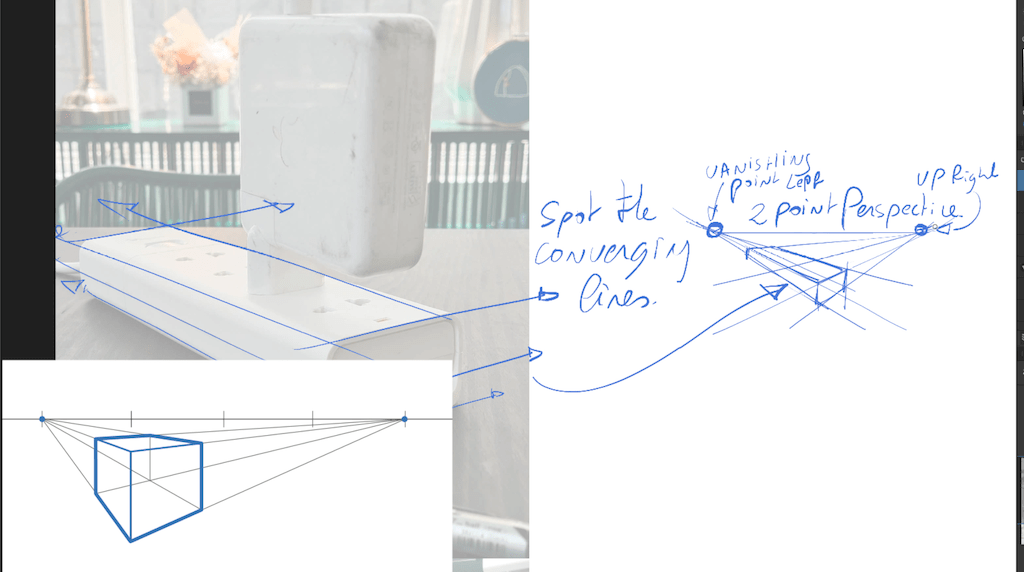
- Observation Exercise: Identify converging lines, particularly the longest line, to set up the perspective.
- Start with the Base: Begin sketching the base, not the plug, to establish the perspective.
- Learn Perspective Basics: If needed, refer to the Designer Starter Kit to learn perspective drawing step-by-step.
- Memorize 9 Perspective Setups: Remember these setups as a “mental 3D guide” when drawing.
- Sketch the Plug: Start with a simple box for the Apple plug. Work from simple to complex, refining as you go.
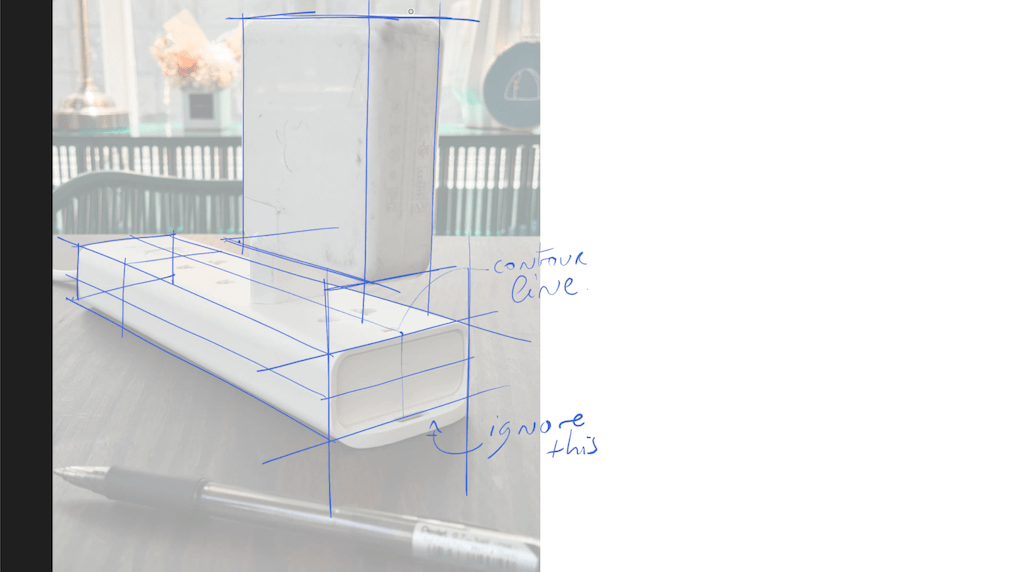
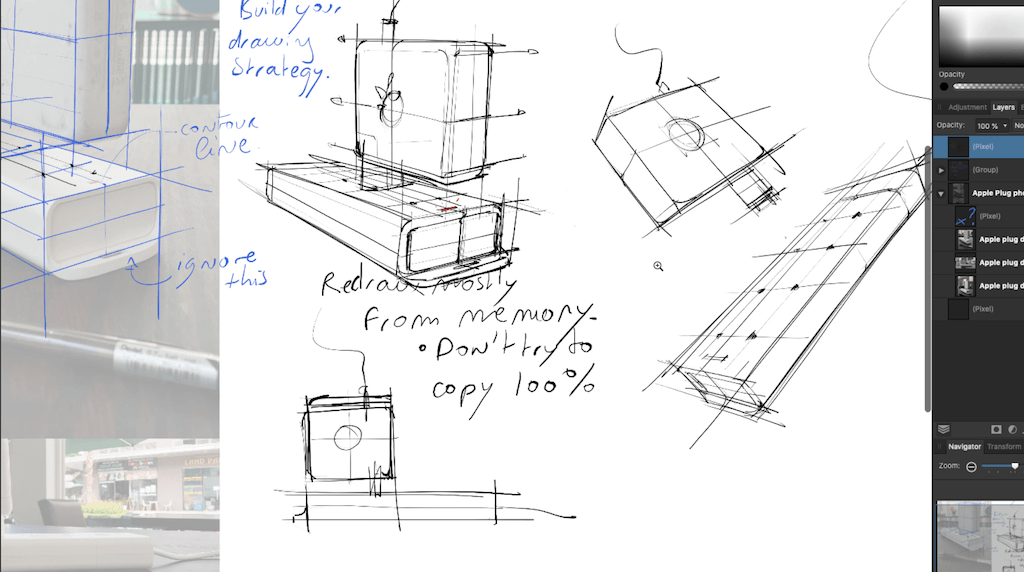
- Add Details: Include details like rounded edges, which can be thought of as “sculpted edges”. Use contour lines to enhance understanding.
Let’s use this photos an underlay. I low the % of opacity a bit.

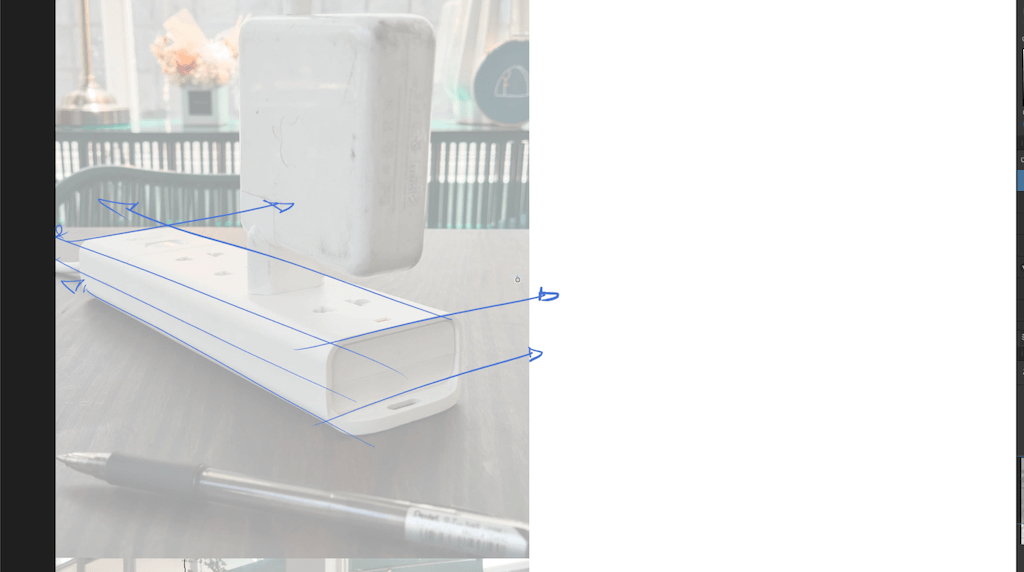
Observation exercise:
Spot the converging line using the longest line when possible.
Note: We start here with the base, not with the plug itself.
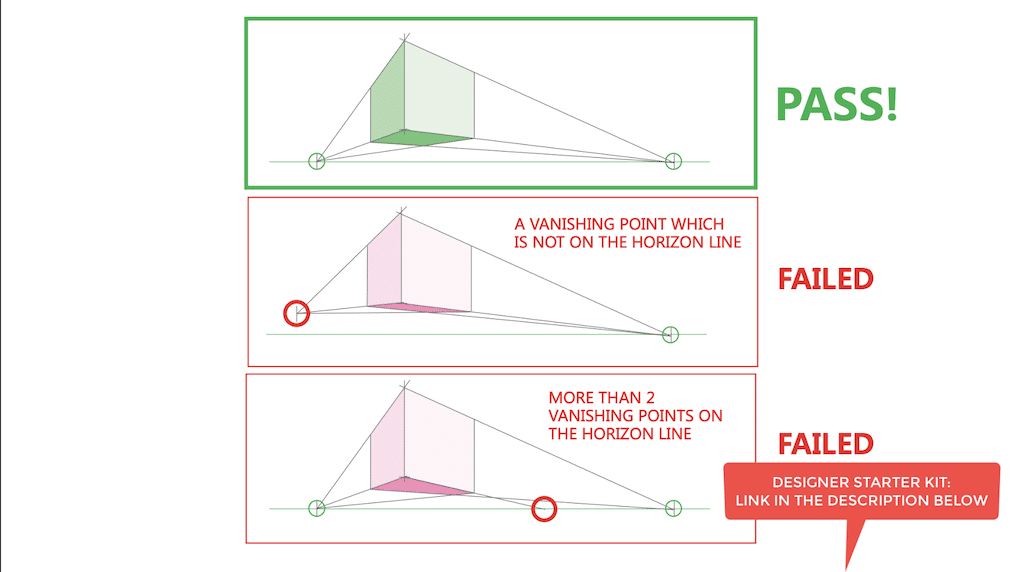
If you need to learn the basics of perspective, I created the Designer Starter Kit for you to learn it step-by-step.
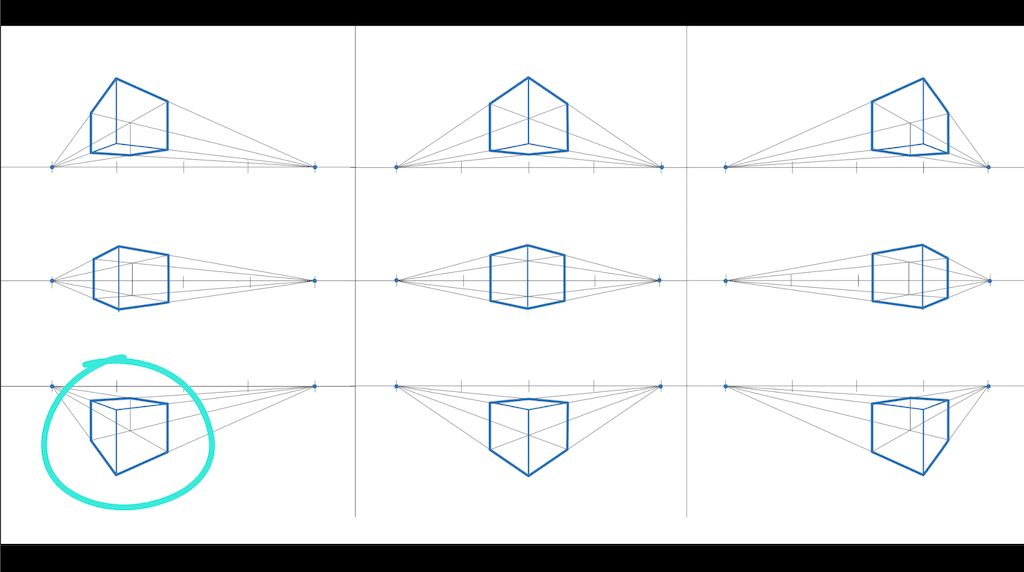
You learn how to draw a cube from any angle!
Here are the 9 main setup to know.
We choose the bottom left configuration for our plug.
Can you see the similarities?
When you start learning to draw in perspective, memorize the 9 perspectives set up to use as a “mental 3D guide”.
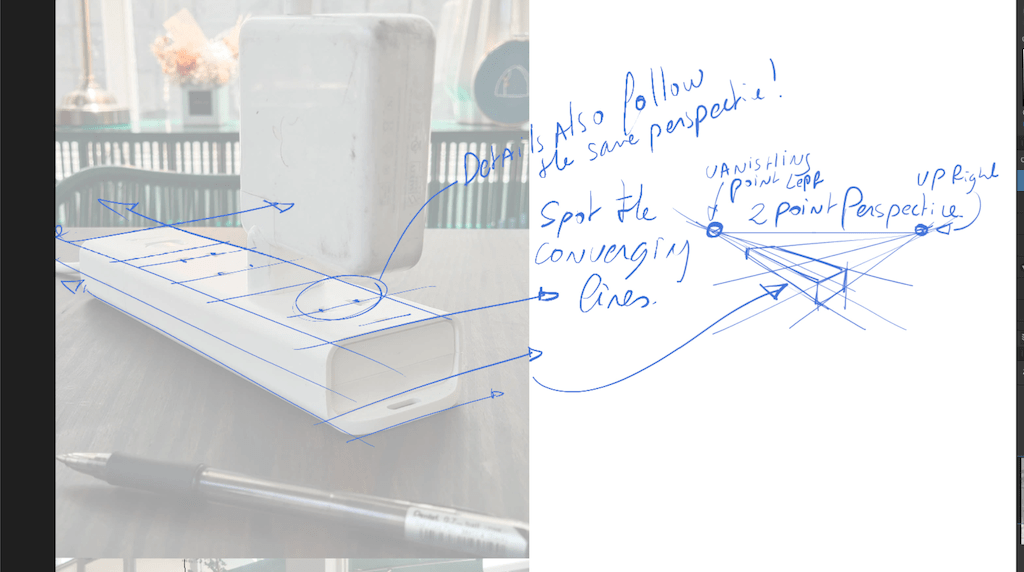
Remember that the details (plug holes) follow the perspective as well!
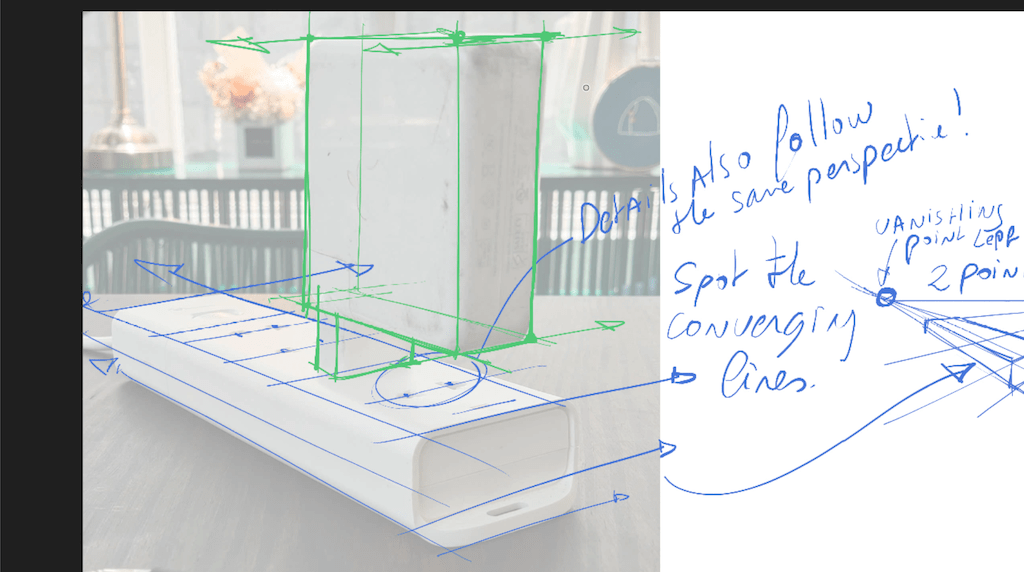
We keep going with the Apple plug (in green) starting with a simple box.
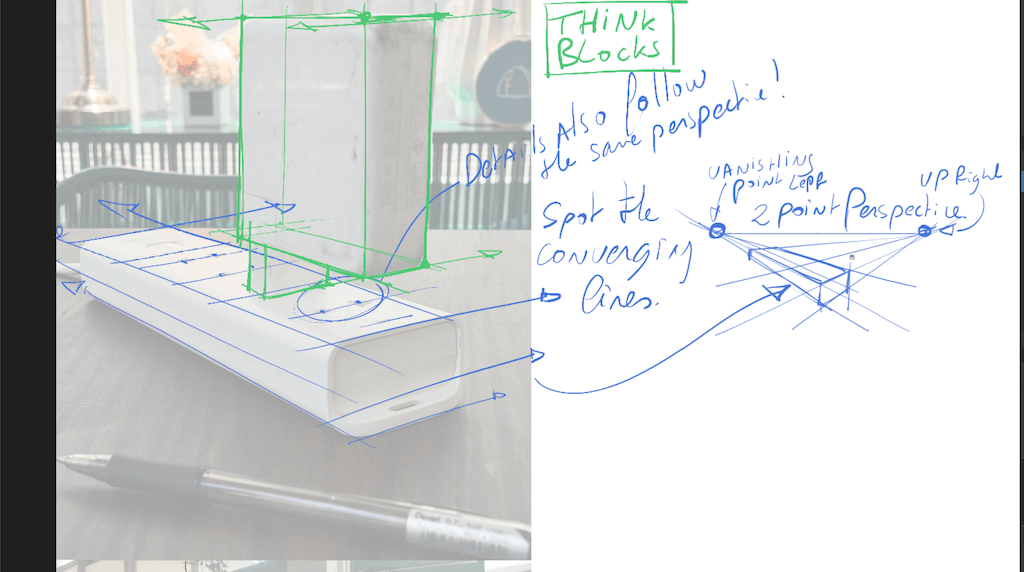
It is essential to simplify what you see to draw the easy way.
Think you are drawing blocks, then you sculpt to refine, add precision and details.
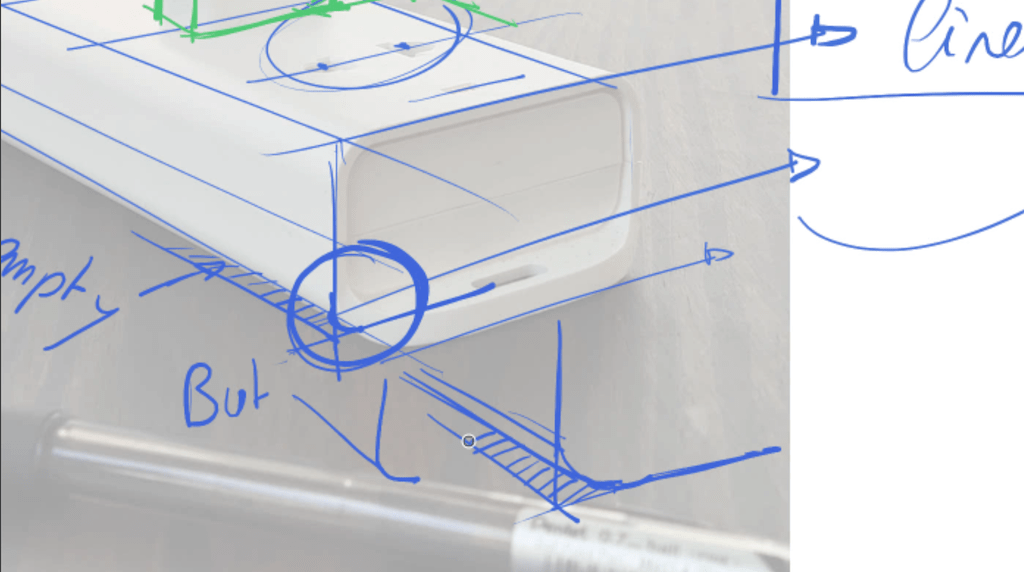
For example here, the rounding is actually a “sculpted edge”
Time to redraw the overall with 2 main boxes.
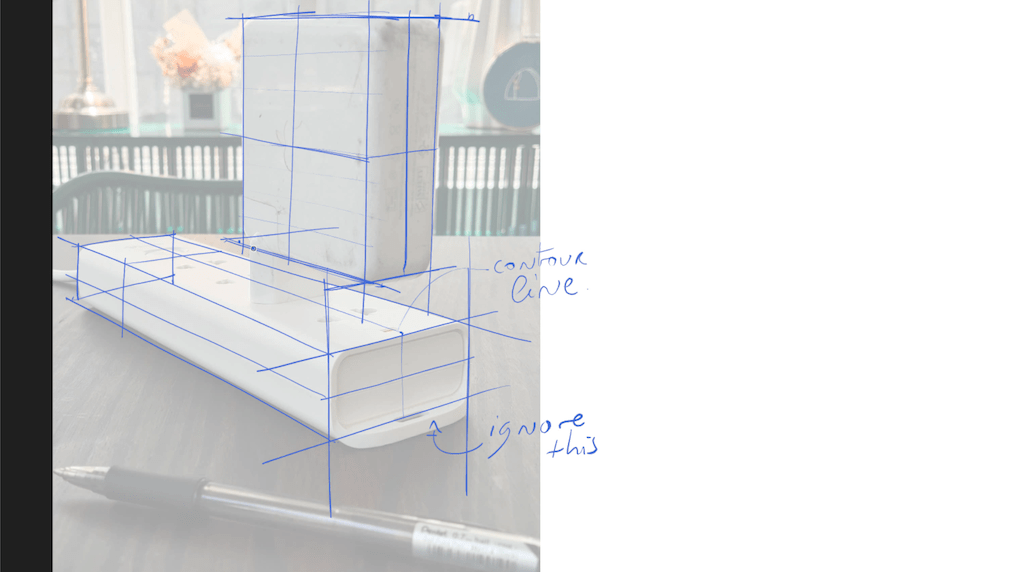
Remember to use contour lines.
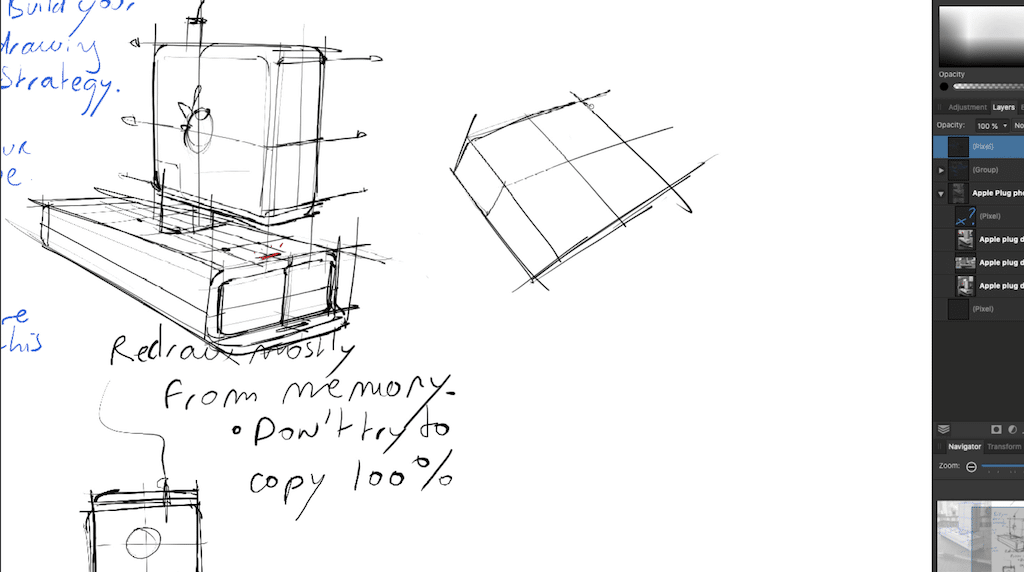
PHASE 3| Draw from memory
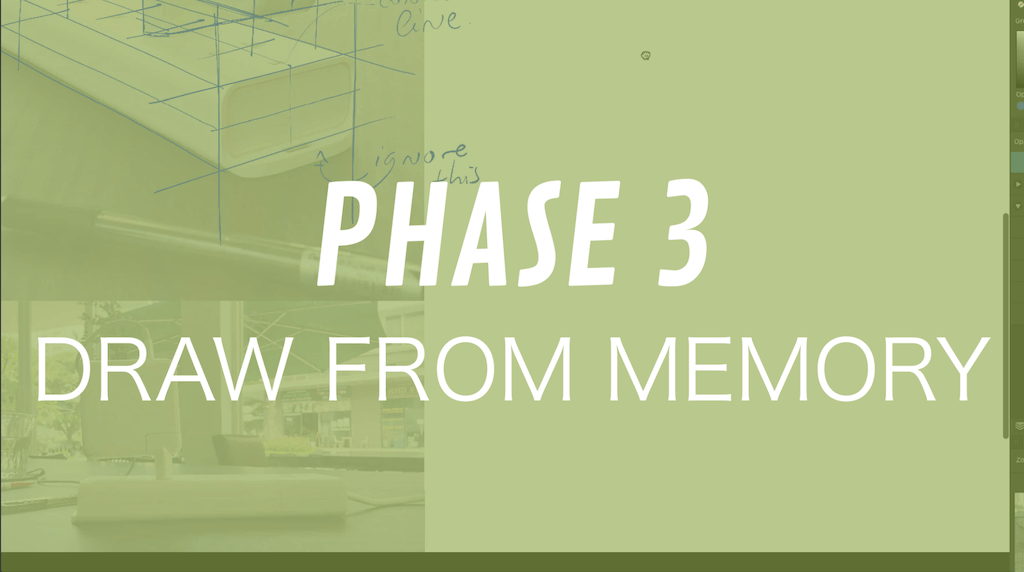
- Memorize the Strategy: After setting up your strategy in Phases 1 & 2, it’s time to draw from memory.
- Warm-Up: Quickly review the side view with a thumbnail sketch to solidify your memory.
- General to Details: Start with the base in perspective, then add the plug on top, ensuring you follow the same perspective.
- Use Contour Lines: These help in understanding the drawing better.
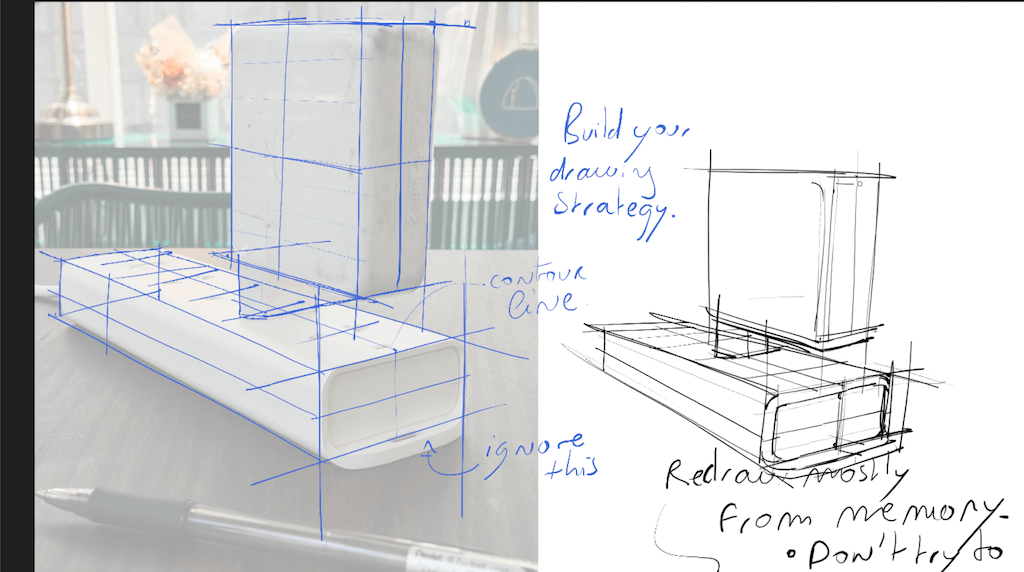
- Add Final Details: Finish by adding the plug holes and other smaller details.
- Climb the Mountain: Follow the tutorial step-by-step, and you’ll see improvement in your sketching skills.
A quick warm-up is to review the side view with a thumbnail sketch.
Remember the rule of drawing starting from General to Details.
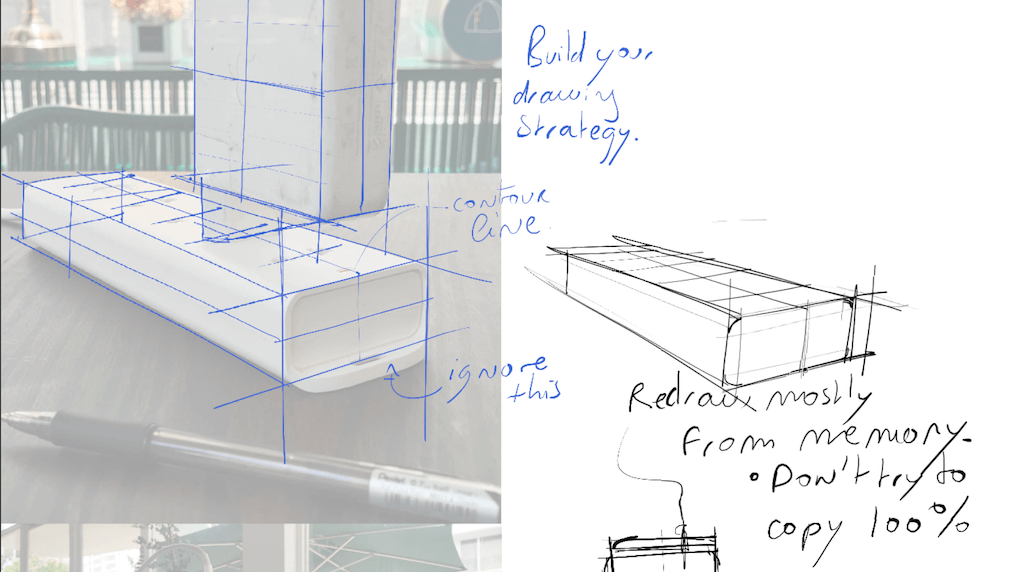
We start with the base in perspective.
We add the plug on top of it.
(Make sure you follow the same perspective)
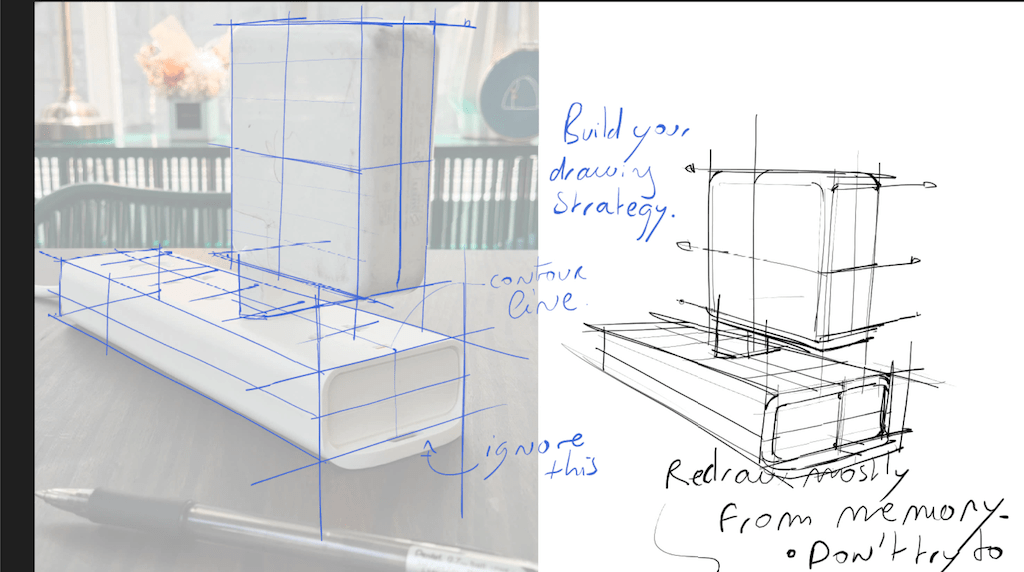
The contour lines help to better understand the drawing.
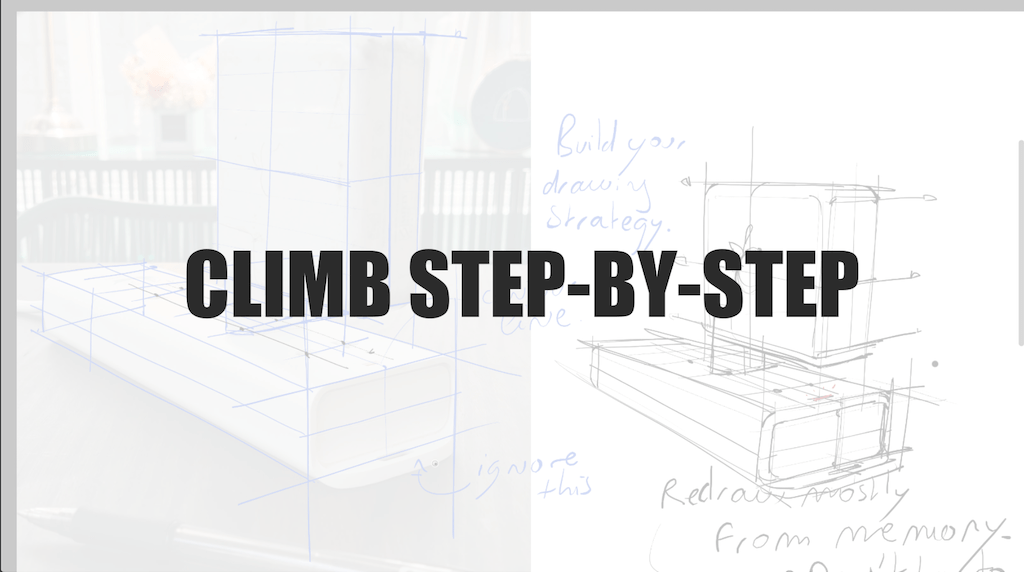
Follow the tutorial, and you will climb the mountain step-by-step.
The last touch-up is to draw the details.

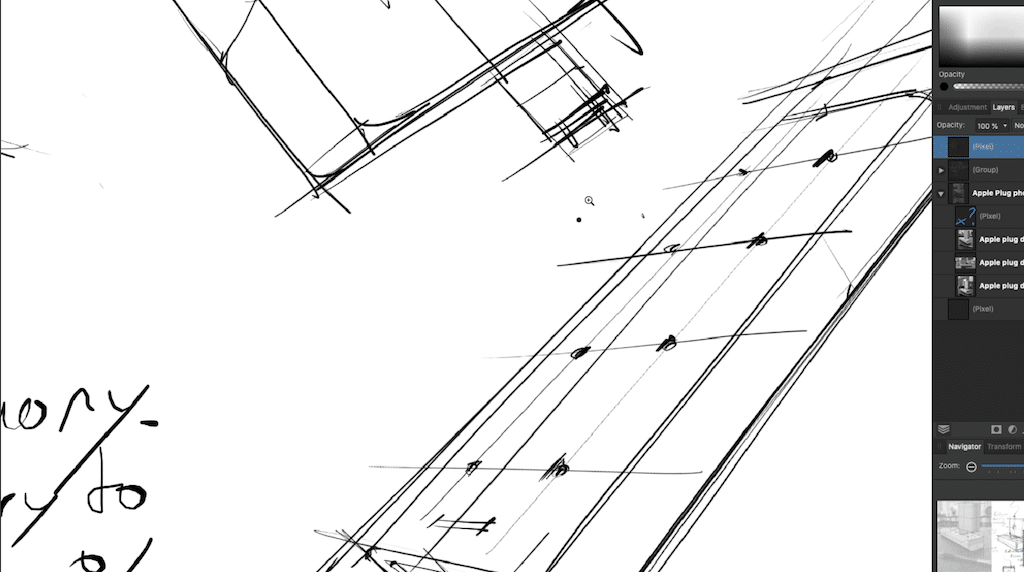
Draw from a Different Angle: Test your understanding by drawing the plug from another angle, applying the same principles.

Wrap-UP!
Mastering the Lego Block Technique for sketching objects like the Apple plug not only simplifies the process but also accelerates your learning curve. By breaking down complex forms into simple geometric shapes, you gain clarity and efficiency in your sketches, enabling you to progress rapidly.
Remember:
- Start with Strategy: Begin with the base, not the plug itself, as this sets a foundation for your drawing and helps avoid common mistakes.
- Practice in Perspective: Utilize the Designer Starter Kit to master perspective drawing, which is essential for understanding and rendering 3D forms accurately.
- Memorize and Draw from Memory: After setting up your strategy in 2D and practicing in 3D, draw from memory to solidify your understanding and skill.
The iterative process of sketching, refining, and adding details ensures that each drawing session builds upon the last. Whether you’re aiming to create product designs, improve your artistic skills, or simply enjoy the process of sketching, the techniques outlined here open up a world of possibilities.
Keep practicing, keep iterating, and most importantly, enjoy the journey of improvement.
If you have any further questions or topics you’d like to explore, feel free to reach out.
Hope you enjoy today’s tutorial!
Let me know if there is anything you would like to learn by email or in the comments below.
Cheers,
Chou-Tac
PS: Thank you Akram for your kind message on Facebook. :)
(Akram is one of my students in my online course Sketch Like The Pros)

Akram Yousry from sketching course for designers: Sketch Like The Pros shares with us his learning journey :)
TRANSCRIPT
Hey guys. It’s Chou-Tac
So today let’s see how to draw an apple plug using the block technique.
Welcome to the designsketchbook.com and feel free to subscribe to my channel and click on the bell to make sure that you receive all the latest tutorials.
So there will be 3 phases and the first one is strategy in 2D. So we can see here we have a block and the apple plug which is connecting to it. So let’s look at the common mistakes. As you can see here, I got draw the apple plug first, which is actually incorrect because if you want to draw these two elements, I highly recommend you guys to do not start by the plug, but start with the base first. You need to have a sense of order. Like, make sure that the base is correct and then you will connect the Apple plug on it. It will help you, you will see, to actually draw the overall in a good proportion.
And the second mistake is actually related to the first one. Don’t draw with the outline. It’s going to give you some clumsy sketches. So first, how you want to draw is the base first with a block number 1. Think and simplify everything by blocks. Now, you have your 2nd block right here that are both connected. And then, you will see this little area you cut and then you have a 3rd block which is a mini block. Okay? Try to decompose everything in simple shapes. This is how you will gain a better sense of proportion and your brain will think in geometry. Not anymore with the outlines but in geometry.
Visit side view and now we are going to draw in 3 dimensions in this phase 2. So we go on perspective. So what I would like you guys to train is to spot the converging lines. Get the longest line as you can and draw these converging lines. Here we go. So if you wonder what is converging light, I invite you to download the designer starter kit to get all the tutorials on perspective step by step.
So, here is a quick reminder of what is converging lights. This is all these lines that going to the vanishing points. So what I am doing here is to reconstitute this viewpoint of this base of the plug, multi plug into perspective. It’s just to show you that when you are drawing on the left side, you need to keep in mind the overall view, like you can see of the whole set of perspective.
And this is how in the designer starter kit you will learn how to use 1 or 2 point perspective. You will learn how to draw this whole set in different angles. And as you can see, the bottom left is the one we choose. Okay? So you have the vanishing point left and the vanishing point right. And here, which is very important, is that even when you are a beginner, you tend to forget that, the details also follow the perspective. Can you see that? They are all having the same converging lines because they all converge at the same vanishing point. Details also follow the same perspective. Always remember that because it’s something which is very easy to forget.
So now, let’s draw the apple plug perspective. So this is a good exercise for you guys to train your 3D view, 3D vision. So feel free to get some advertising, prospectus, product advertising that you can see in shopping malls. And then, you take a pen and you draw on top of the products or you can print some products you like on the Internet and then you draw on top or directly draw on your graphic tablet as well. Up to you.
So remember to draw in transparency. Like imagine this apple block is transparent so you can draw the perspective lines. And as you can see here, we see some blocks. So you think blocks. So mainly for the apple plug, it’s a block. For the bottom one, we are spotting the converging line itself in blue. It’s not really a block yet because there is this rounding that we need to take into consideration.
When you do a rounding, you are actually adding some empty space. See? Like the outside edge is here. And this is where I would like to envisage here is that you need to simplify what you see in blocks and we are going to take into consideration this empty space when you will want to redraw this product from beginning. And this is what we are going to do here.
So this one, I purposely ignore this little extrusion that is going out to simplify it. So I got draws the front face, the back face, and I connect them. This is pretty convenient when you are analyzing a product; You think like extrusion.
I add some contour lines which help to better read the product. And contour line is mostly like imagine you are cutting your product in two; like this is what gives you some sections. I like to draw contour lines on horizontal and vertical.
Let’s go on the block here—another block—I draw transparency and oops! I have done a mistake! Can you spot it? Here we go—iteration! Because my eyes were forgetting that all lines follow same perspective.
Here we go—control lines for Apple plug can be better! Alright! And with experience when a line goes wrong—You will feel it—it will become intuitive! And this is what you need target by practicing.
So what we do here is that we are building—you are building your drawing strategy—we started with block at bottom; We draw block on second part! Okay? Try remember order!
And now we have strategy—phase 3 withdraw from memory—and this gives mostly freedom! Before that it’s good have quick reminder with thumbnails: Block block mini block—and then go on details with wires if want! A little extrusion!
So here idea: Go from general details—like getting block then sculpt it! Okay? Let’s go on perspective—I draw mostly from memory—I try make abstraction reference pictures—the picture should be my mind now!
So don’t try copy what see 100%! Why? It’s because I want guys train your 3 divisions so you’ll be able draw product any angle—even if see from viewpoint your brain able rotate product any angle!
And this pretty much it; This when as product designer really elevate sketching skills! Here iterate bit; okay—I do rounding right here; up little extrusion—and remember always start light!
Okay? So light drawing for construction lines then bold along way—the control lines help better understand volume! And now elevating vertically get apple plug!
I’ve got my second block; there we go—put third mini block right here! Now add roundings—think of it like sculpture once again! Contour lines help better understand!
There we go—can see how contour lines helping get more realistic feel of your product? Remember: converging line okay has go back!
Here quick Apple logo—when just starting blocks really helps brain decompose everything simple steps—this how get something complex! Start from same thing—a suite series many simple actions—it’s like trying climb mountain—it looks impossible but just climb mountain step step!
Be patient—and soon realize you’ll be top ready see beautiful view top mountain—and can proud yourself—step by step!
So for bottom part bored little bit; Here we go—can see blocks left more refined version right!
Alright—now time for bonus challenge: Draw from different angles! If you’ve understood works perspective designer starter kit—you’ll able draw products memory another viewpoint—and where challenge guys!
You have same logic: Start with some blocks then draw rest! Here decide disconnect plug multi plug base itself; drew box first then sculpt it roundings corner logo here for apple.
Then here—which multi-block mini-block—and extend it! Remember follow perspective; Here we go!
If really want crazy about cubes—I also invite go cube mania challenge—a series three videos where I’m going train how draw beautiful boxes perspective—and so it’s going totally intuitive after these three videos because practice key right techniques!
Feel free really show many boxes possible—you never get too many—this super important because whenever want draw product design—you really build intuitive perspective mind!
So it’ll start be very fun go from very simple form something more complex!
So now—I’m then adding little bit details; Here we go—so that’s it—I hope enjoy tutorial and I’ll see next video!


[…] I realized that I was limiting myself from exploring other aspects of design that also […]