Most beginners fail due to a misconception about drawing.
We tend to admire artists drawing portraits with such talent that we copy their techniques for Product design. However, it will, unfortunately, make you fail.
Reasons Beginners fail at Drawing Product Designs
- 00:00 Start
- 00:06 Let’s draw a defibrillator
- 00:27 Study Medical care design
- 01:17 MISTAKE 1 | START WITH DETAILS
- 02:27 MISTAKE 2 | Draw in 2D with a grid
- 05:09 BENEFIT 1 | Draw anything from any angle!
- 10:46 BENEFIT 2 | Modify what you see
- 14:54 No shame to copy!!
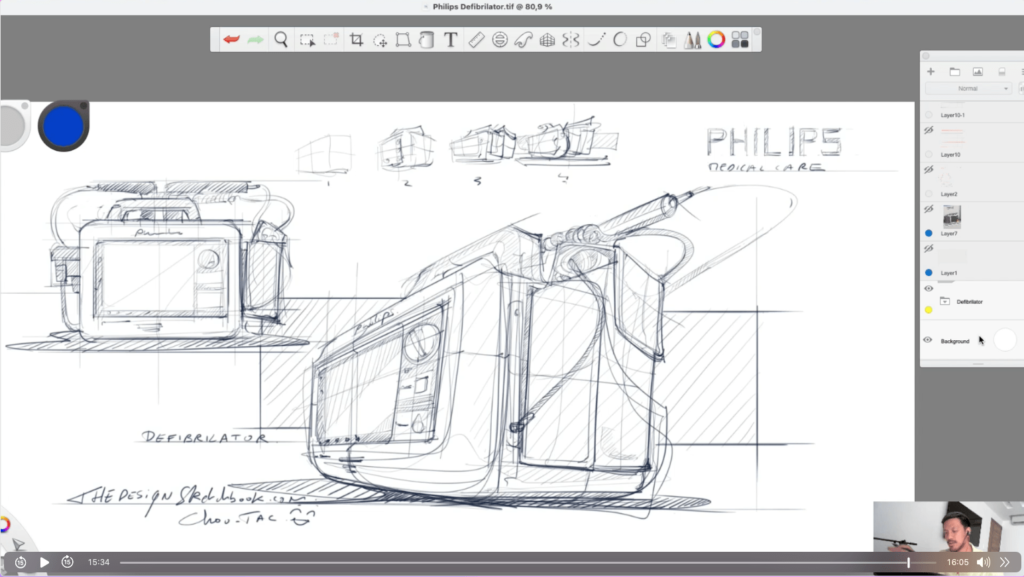
- 15:34 Sketching Result (Full process in the next video!)
My friend just had a motorbike accident.
He got 3 ribs broken : /. He’s now fine and needs plenty of rest.
We went to the hospital to support him,
and I took many pictures of the medical care appliances to capture inspiration!
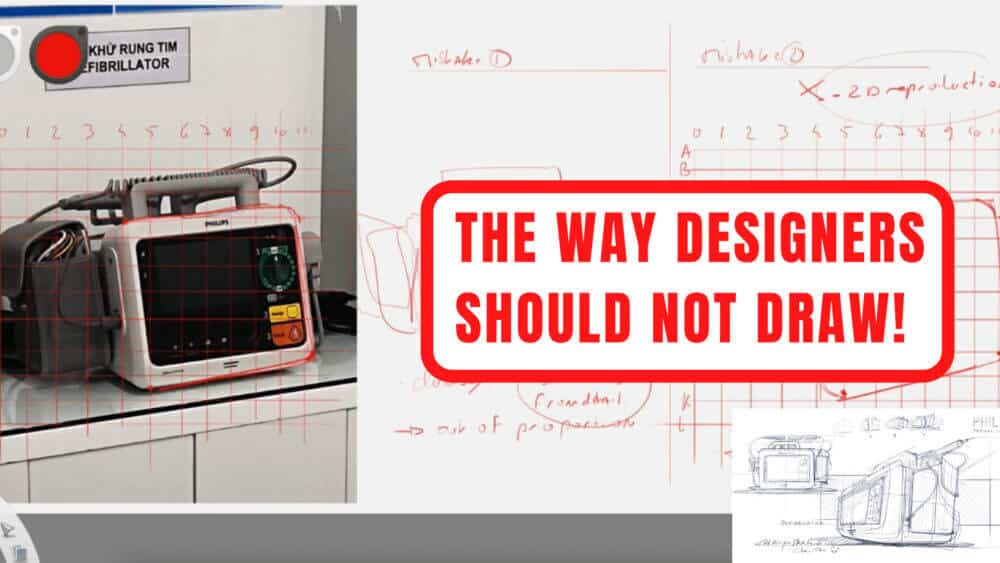
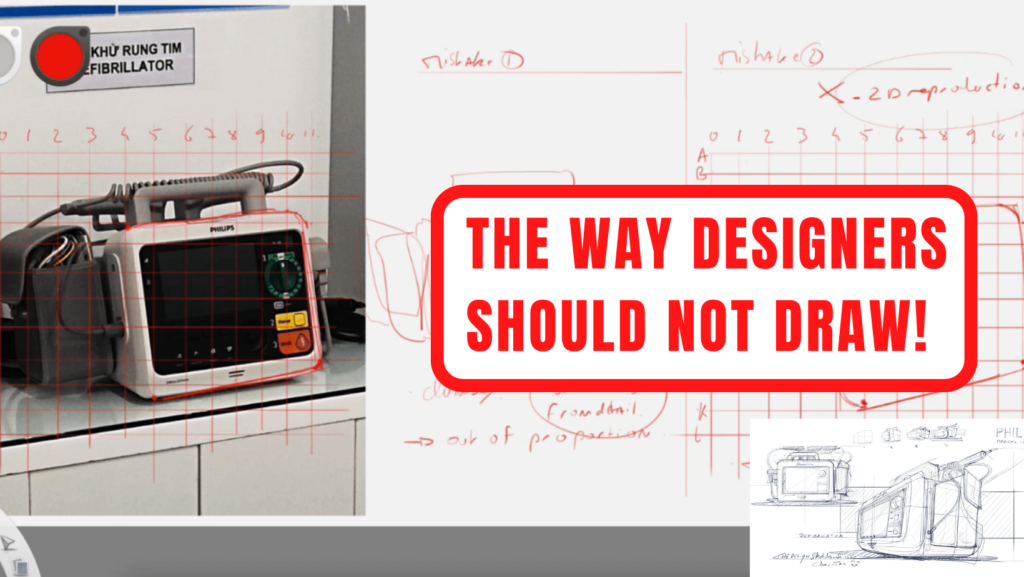
There was this retro television with a canvas bag attached to it.
That was a Defibrillator. (My friend didn’t need it by the way!)
I wanted to draw it.
Reasons Beginners Fail at Drawing Product Designs: Common Pitfalls and Solutions for Aspiring Designers
Hey there, aspiring industrial designers and product creators!
Today, we’re diving into a topic that’s close to my heart: why many beginners struggle with product design sketching and how to overcome these challenges. Drawing a defibrillator may not be the most glamorous subject, but it’s the perfect example to illustrate the common mistakes and the journey towards mastery.
The 2D Artist Trap
One of the biggest misconceptions in product design sketching is that it follows the same principles as traditional 2D art. Here’s why this approach fails:

- Mistake 1: Starting with Details: Many beginners dive into drawing the intricate details first, which can lead to disproportionate drawings and confusion. Instead, start with the core form of the product, understanding its basic shape in 3D before adding accessories and details.
 It is too time-consuming to draw with a grid, and you can’t draw any other angle.02:27 MISTAKE 2 Draw in 2D with a grid
- Mistake 2: Using a Grid: Drawing in 2D with a grid, like realistic portrait artists, may help initially but limits your ability to visualize and modify from various angles. Product design requires a 3D vision, where you can imagine the product from any perspective.
The Benefits of Sketching Right
Let’s flip the script and look at the advantages of approaching product design sketching correctly:
- Benefit 1: Draw Anything from Any Angle: By focusing on the core form first, you develop the ability to draw and understand products from any angle, not just the front view. This skill is invaluable in product design, allowing you to communicate ideas effectively.
- Benefit 2: Modify What You See: Sketching with a 3D mindset lets you modify, adjust, and innovate on what you observe. It’s not just about replicating; it’s about creating something unique and functional.
The Iterative Design Process
Remember, product design isn’t a one-time event; it’s an iterative process. Here’s how it works:
- Start with Research: Sketching what you see, like the defibrillator, helps you capture inspiration from the world around you. This stage is about understanding the product’s form, function, and user interaction.
- Iterate and Refine: Through trial and error, you refine your sketches, exploring various design options and testing ideas. This is where you might discover new features or solve ergonomic issues.
- Validation: The final step involves validating your designs through user feedback, testing, and expert critique. This stage ensures your design not only looks good but also meets user needs.
No Shame in Copying

There’s a common myth that copying is wrong. Here’s the truth:
- Use Reference: Copying can help you understand form, proportion, and detail. The key is to use it as a learning tool, not as your final design. Modify what you copy to make it unique and functionl.
Order Matters
One of the 3 KEY PRINCIPLES in design sketching is that “Order matters.” Here’s how it works:
- Plan in 3D: Before you start drawing, visualize the product in 3D. This mental exercise helps you understand how the pieces fit together before committing to paper.
Conclusion
So, aspiring designers, let’s recap:
- Start with the core form of the product, not the details.
- Avoid using a grid for product design sketches; instead, develop a 3D vision.
- Embrace the iterative design process to refine your ideas.
- Use copying as a tool to learn and create something unique.
- Plan in 3D before drawing to simplify your sketching process.
Remember, every sketch is a step towards mastery.
Whether you’re sketching a defibrillator or designing the next big product, these principles will guide you.
Let’s keep sketching, keep learning, and most importantly, keep enjoying the process.
Your passion for design will take you far, so keep going, keep dreaming, and keep having fun with your designs!
Happy sketching!
Cheers,
Chou-Tac
See you in Part 2:
Simplify your drawing process (in 4 steps only)
TUTORIAL TRANSCRIPT
Hi, guys. Welcome to the designsketchbook.com. I’m Chou-Tac.
And today, we are going to draw this defibrillator right here.
So I know it’s pretty unusual. It’s just that my friend had a tree ripped broken yesterday because he had a motorbike accident. Luckily, he’s fine; it just will take some time to rest and heal. When I was there, actually, I was observing the different stuff around, and I felt pretty fascinated by the medical care design. I spotted this defibrillator right here, so I thought that we could draw it and learn something from it.
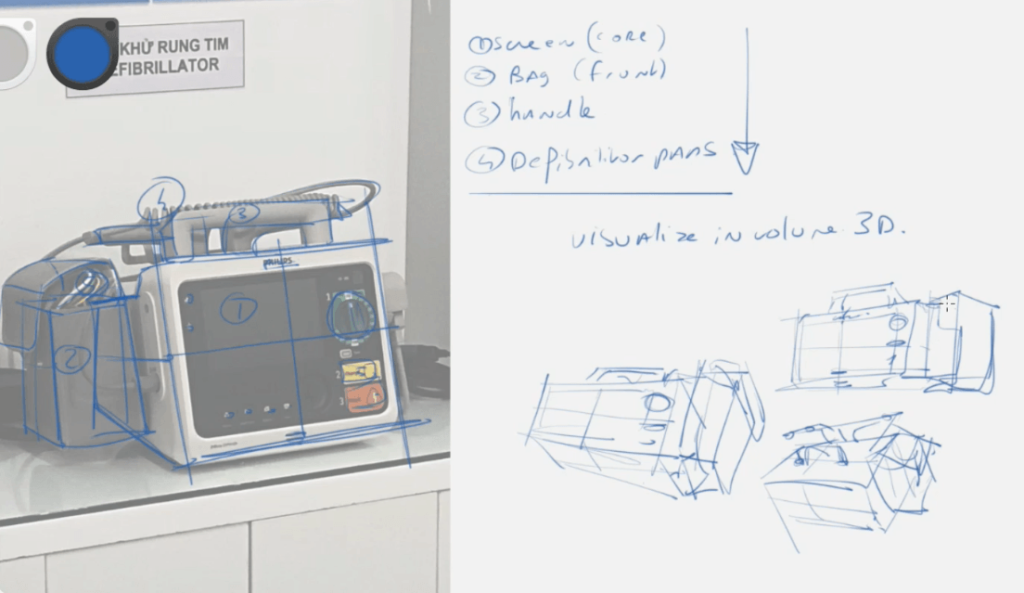
Why does order matter when you draw as a product designer? You can see these 4 steps here: 1, 2, 3, 4 steps. It’s actually about having a certain strategy and deciding on the different elements of this defibrillator in a specific order. For example, you have the screen, the back, the handle, the defibrillator pads that are behind, and all the small details.
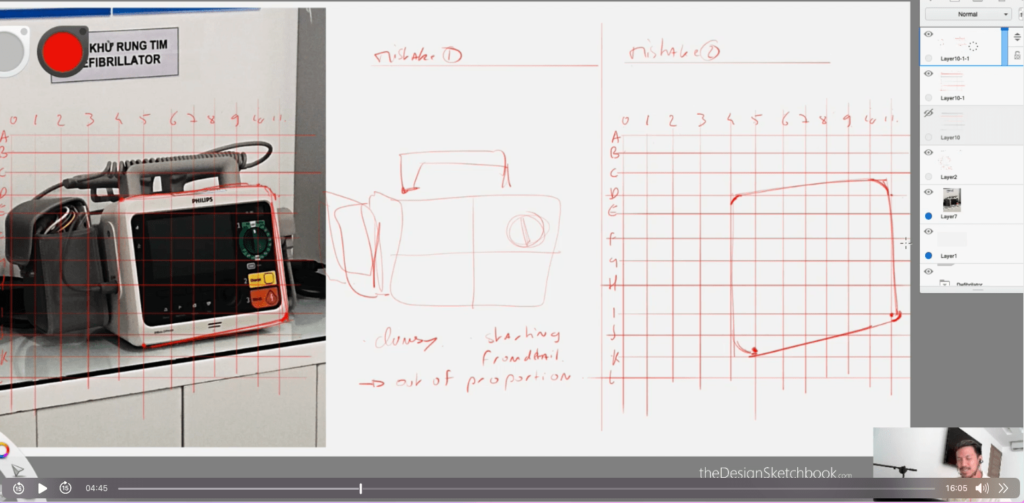
When you are a beginner, the common mistake number 1 that we make is actually starting with the details. Like, let’s start here with mistake number 1: Mistake 1 is to draw with the details. Maybe you will start with this little wheel right here. Maybe you will start with the handle or maybe with the bags. I don’t know; it’s just that it won’t make sense. The great thing is that you are trying to draw, which is wonderful, and this is why I’m going to help you with that. It’s just that at the end, when you don’t know where to start, nothing makes sense and you end up with something very clumsy.
Because you’re starting from detail, nothing makes sense and you will be out of proportion. Right here. And now, let’s see mistake number 2: Mistake 2 is basically when you’re getting inspired by the way that people or artists who do portraits use a grid. Let’s say right here; let’s draw a very fast grid here. Have you seen this method before? It’s a great method for reproducing; however, for a designer, there’s no point in reproducing something 100% because what you want—the ultimate goal as a designer—is to create something new.
It’s not just to be able to reproduce something. This is a, b, c, d, e, f, g, h, i, j, k; let’s say 0 through 11—it’s like a game actually. So you’ve got this and then let’s click it; we’ve got 2 here. It’s a bit too big; okay; let’s put it here. When you have this grid, you’re going to try to reproduce what you see. Let’s say you want to get this corner here which is next to d4—d4 which is a little bit lower is here at this corner.
Then here from 10-11—c and d—c and d here: 10-11. But here you’ve got another corner here and then you’re going to connect them because you can see it’s connected right? And that’s what you want to do here; you’re going to connect it here maybe this 1-j and k in the middle—j and k which is 5—jk5.
Here you’ve got a corner at 11—I-I—11 right here; you’ve got another corner doing like this then you’ll connect it then from let’s do this edge connected—this edge is connected—and as you can see it takes super long to draw! You have the face of the screen and we have spent—I don’t know—like a few couple of minutes and we just get this—it’s pretty time-consuming.
If you do it very well then that’s good; it’s a great skill to have—to be able to reproduce something 100% from what you see—but as a designer that’s not what you want! First off—you want to draw fast! You want to be productive! And also what you want as the main benefit is to draw anything from any angle! Like as a designer when you see these pictures you’ll be able to draw them from different angles—from below or from above—and so on.
Okay! We have two main mistakes: The first one is starting from details and mistake number two is drawing with two-dimensional reproduction right here! Okay? So these two must be avoided.
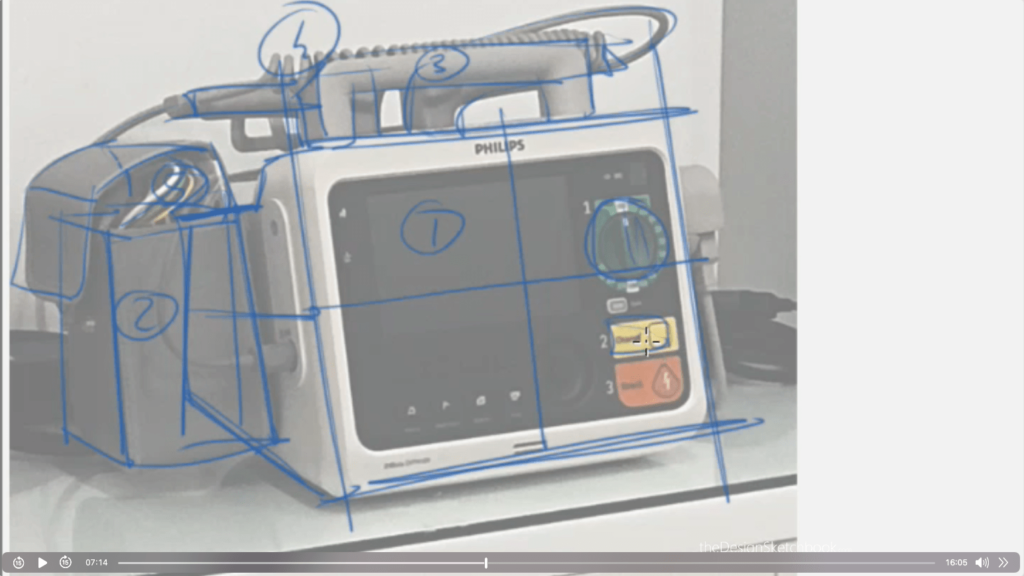
Let’s hide the layers now; what we want to do is change color—something happens here with blue—what you want to do is actually see things as volumes! Let’s say we have this screen here—you have to see through—you see this back? You have to imagine that the screen is actually behind there and this forms in three dimensions.
You have this volume right here and then when you have this first volume as a core I’m going to add this pack as a second element that I also see as three-dimensional volumes—I see through—and then you’ve got the flap that goes on top of it.
Okay! You have then the handle coming in—here we go: one-two-three—and what’s behind—the defibrillators—that are more detailed—here we go—and then cables… so four for this one—and maybe small detail—the cable—the button—here five icons: Phillips logo—the little perforation right there!
So we’ve got five steps at the end: one—the screen—that’s the core; two—you’ve got the small bag in front; three—you’ve got the handle; four—the defibrillator pads! Okay? So that’s different orders that you’re going to draw all of them and most importantly—you visualize everything in volume! Visualize in volume!
So three-dimensional reasoning is important because you’ll be able to draw from different angles basically! Let’s do some of those! Let’s say I want it sitting maybe like this—with bag handles—maybe oh that’s true also with flap right there—details right there if you believe they’re behind!
Or maybe I wanted to draw it like this for more of a top view! So I’ve got core then I draw bag then I’ve got handle then defibrillator right there! See? I’ve got different angles!
Maybe if I draw as what I see super fast your brain actually memorizes different elements so at the end—I don’t have to look that much at reference pictures because it’s easy to memorize everything instead of trying memorizing from grid which dot is which dot going left-right all the time.
And here—as soon as I’ve drawn few of them my brain could memorize different elements! Here! Here! And so I can draw faster—with different angles!
So benefit is any angle because once again when you’re drawing portrait with two-degree—you are constrained drawing what you see! I’m not at hospital anymore and I won’t be able if using grid techniques—to draw from another angle—but as product designer since think in three-dimension if your customer or clients asking for different angles or views or small details—you’ll be able do that because you’ll generate three-dimensional visualization!
Okay? And there’s another benefit—a plan—to see things in three-dimension—to modify what you see! Let’s say maybe wanted screen longer—and maybe back taller…I don’t know—I can’t do it because I’m able modify stuff because all has been simplified processed into simple three-dimensional volumes first!
Maybe handles—I want them different—I don’t know maybe in two parts—I’m saying making sense—it’s just saying I want able modify stuff maybe button on left—maybe another one on right—the screen will be middle—it’s up create stuff after that!
This exercise memorizes feed your library forms feed library forms—this study things around wherever go hospital or sports meet friends go their place—you’ll notice something interesting take pictures!
When I was hospital my girlfriend was actually wondering why taking pictures—and then I showed her—it’s because studying also showing these tutorials! So memorize!
The great thing with this is—you’ll subconsciously keep mind forever—that can use redraw later if you’re going drawing machinery weapons or anything may create future!
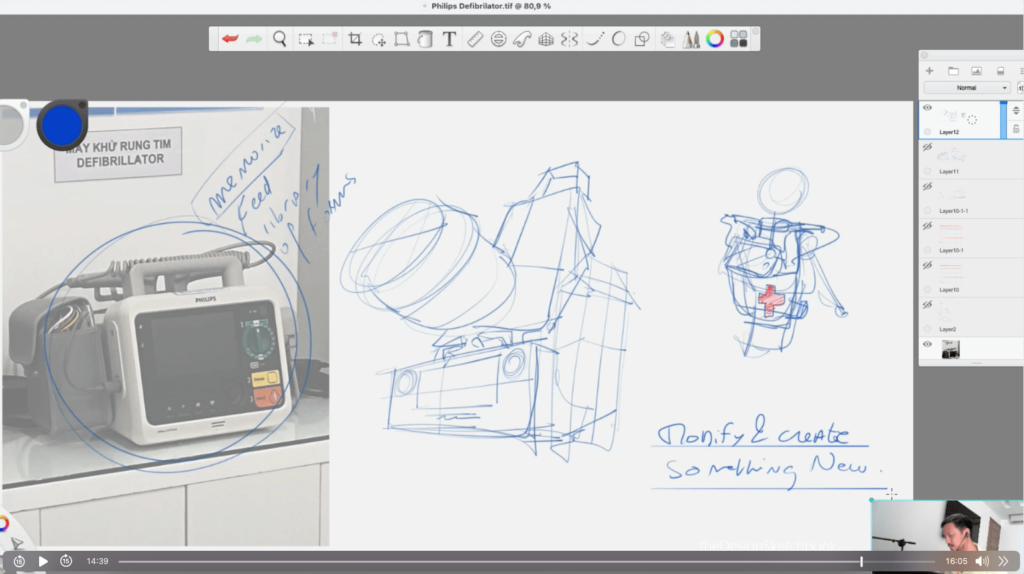
Okay? So modify stuff much want after that! Maybe—I don’t know—it doesn’t make sense but what if screen round up right there? What if back behind handle back—which actually feels could be something imagine mobile defibrillator?
Right? It can carry backpack let’s say main body good—and backpack—screen handles—and defibrillators come some quick doodle create stories when you’re designer need create stories people understand usage!
Okay? And so they’re running emergency after he can spot act save lives—I don’t know just some very quick somehow nonsense but sometimes nonsense can surprising!
So here what want modify create something new from what learn okay? So those two main benefits—that what want—you want join any angles next level creativity modify create according stories ideas have mix products!
Okay? There’s no shame copy because something need go through create something new! Don’t think you’re designers or so-called artists can create things without reference don’t ashamed need go get more references see things much can explore world!
Don’t only look Google images when did things go out when see interesting capture store whenever need use study quick doodle—you can draw spot home really up!
There are no specific rules—but once again remember draw with different orders now time go through sketch explain process along way!
Alright! See you there!


[…] In the world of design, professionals often work under tight deadlines with limited tools—typically just a pen and paper. The goal is not to create beautiful sketches immediately but to effectively communicate ideas. […]
[…] I created a beginner tutorial>>Reasons Beginners fail at Drawing Product Designs […]
[…] The design process is iterative, involving trial and error. It involves a few stages of validation from the first sketches of research to the final proposals. […]