Hey Sketchers,
If your perspective on your sketches looks awkward, or they seem lacking in details, these today 2 sketching TIPS might help you.
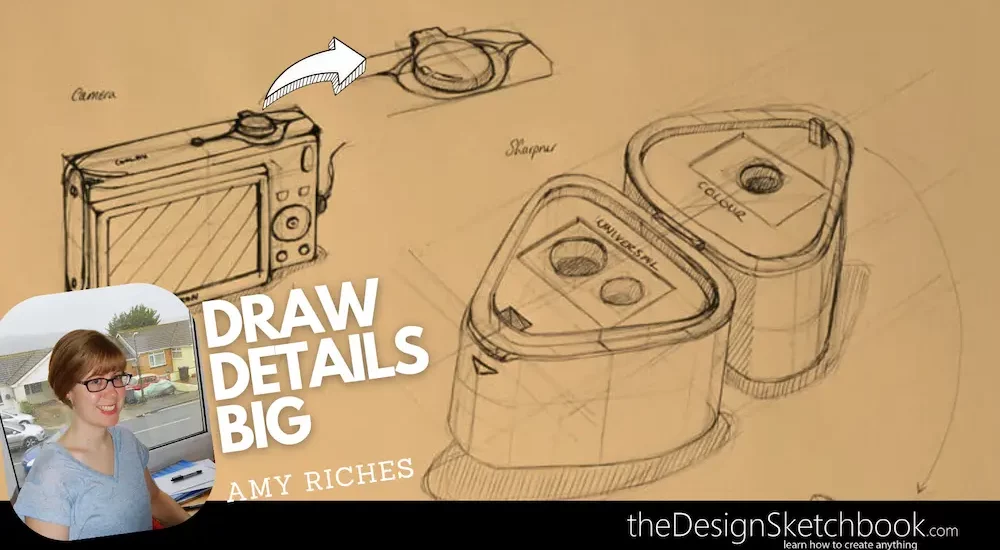
I’ve just received an inspiring sketch from one of my VIP students of [Sketch Like the Pros], Amy Riches from the UK.
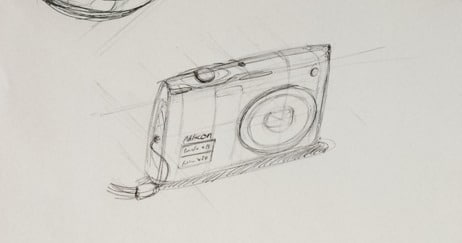
At first, she sketched a camera that was pretty ok – however, the perspective was a bit weak.
I shared with her 2 simple tips, and the day after only, I received a good quality sketch! :)
Amy is highly motivated to progress.
Let me share with you the 2 recommendations I gave to her.
Amy’s story and testimonial about Sketch like the Pros course.
(You can join the Waiting list for the Design Sketching course here.)
TIP 1- Start Drawing with a Box.
It’s essential to start drawing in a certain order.
- Never start drawing a camera with detail like the button for example or any other function. Start with the general shape.
- A camera being “rectangular”, drawing a slim box will be the best start.
- The box set up the proportion of the camera and the perspective scene in no time.
- As soon as you have your box, you can make subdivisions to add in the elements (screen, buttons, plug, screws…).
Try to spot in the picture above, Amy’s construction lines (box, contour lines, subdivisions made with light pen pressure).
Just after receiving my feedbacks, Amy applied the sketching tips immediately. So I could see her improved sketches within 24 hours only:
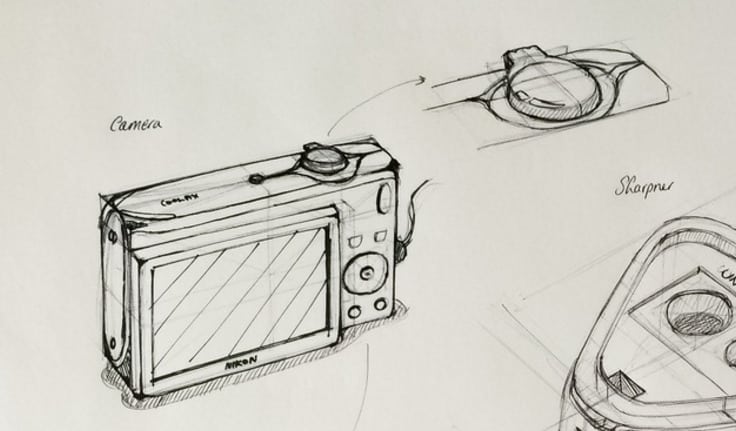
TIP 2- Draw Details BIG!
As a beginner, we often have this “bad habit”: drawing small – and we draw small details even smaller!
When you draw small, 1 mm wrong can easily make your sketch look awkward. Drawing tiny stuff makes us feel so frustrated! We can’t achieve any good detail, and we have no clue on how to improve them. It’s like the pen nib is too thick…
The solution is simple.
Draw the details big!
Like if you have a magnifying glass.
Amy told me the benefits of it:
“Had a go at pulling out some details and making bigger – found it easier to think about the geometry with more perspective and construction lines :)”
Learn how to observe things closely,
practice drawing BIG and your sketch will rise in definition and quality.

Add beside a “zoom in” details of the buttons, clip, nib, screw, mechanical pieces, grooves…
Hope it helps!
If you know anybody to whom these sketching tips can be helpful, feel free to share!
Take care.
Cheers,
Chou-Tac


[…] when it comes to creating cool sketches, starting with the main shape and avoiding the temptation to dive into details immediately is crucial. This approach allows for a dynamic and expressive design, much like an […]
[…] Use the “overlaying shapes technique” often while sketching; start with a simple shape then refine it by adding small specific details. […]
Bonjour Chou-Tac,
Merci beaucoup d’avoir partagé c’est très intéressant et d’une grande aide!
Ravi que ca te soit utile Bitya.
Chouette. :)
Hi Chou,
Yes please! Could you let me know when you think the class will open up and how much it would cost?
Email: silentjosh847@gmail.com
Thank you!
Hello Josh,
I haven’t decided yet about when it’s going to reopen. Should be within the coming months though.
Have you subscribed to the newsletter? It’s the best way to keep in touch with you about the blog and the course as well. :)
Is there anything else I can help you?
Cheers,
Chou-Tac
So what is [sketch like the pros]? Is it some sort of online course? How can one sign up? I bet it costs a bit of money, but it’d be worth it to receive feedback directly from a great and enthusiastic teacher like you!
Great site by the way!
Hello Josh,
Thanks for the kind word :).
Yes, Sketch like the Pros is an online course where I can give you 1-to-1 feedbacks on your sketches if you want to.
The course is now ongoing with the students. So the registration are now closed. I can update you on when the course reopen again though!
Have a nice day!
Cheers,
Chou-Tac