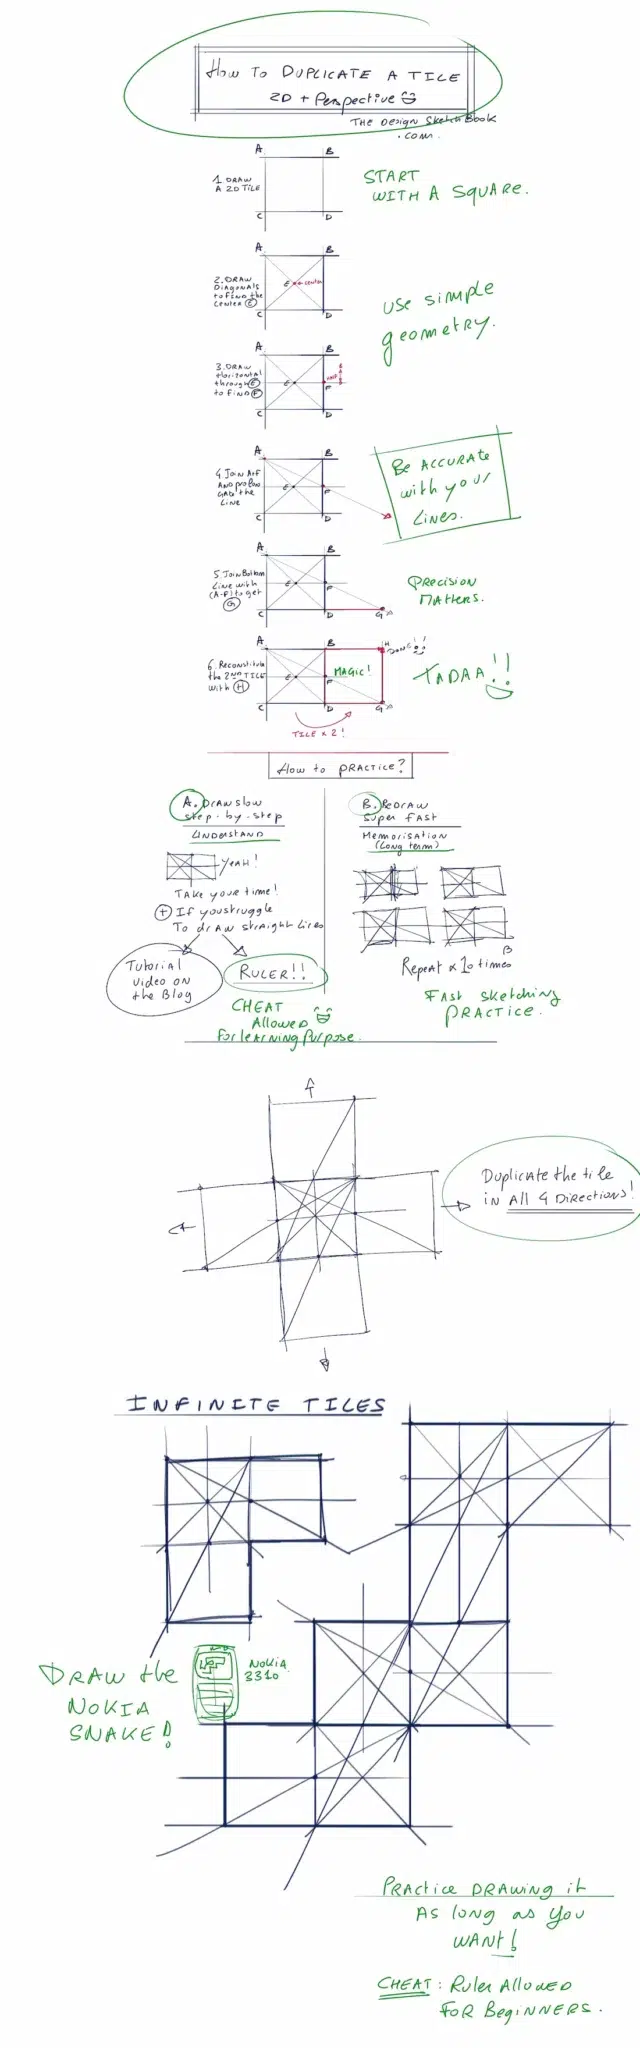
- Step 1: Draw a Simple Square (+Name the Corners)
- Step 2: Draw the Diagonals to Find the Center
- Step 3: Draw a Horizontal Line Through the Center Point
- Step 4: Extend Lines to Create the Second Tile
- Step 6: Duplicate The Tile Distance
- Step 6: Connect the Dots to Complete the Duplicate Tile
- Congratulations!
- Duplicate Tiles in all 4 Directions
- Why This Is Useful for You
- More than a Drawing Technique, Learn Patience and Dexterity
- Practice Phases for Learning
- Tips for Beginners
- Why Geometry Is Key
- To Explore More Drawing Cubes in Perspective!
- Final Thoughts
Hello Sketchers!
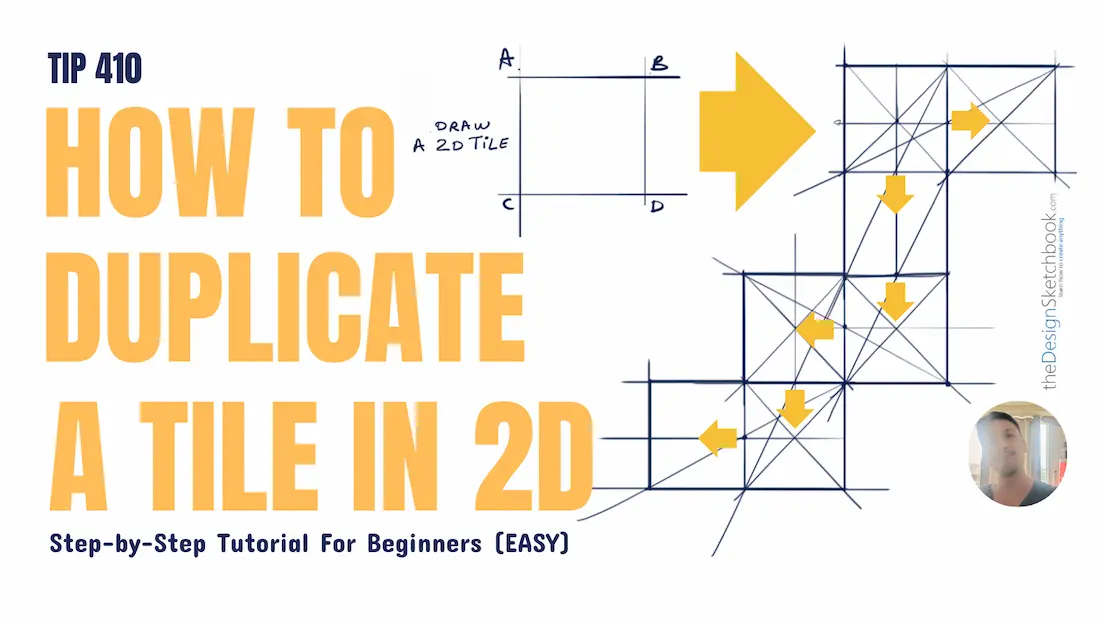
If you’re just starting out with Industrial Design Sketching, I want to share a really cool and useful trick with you: How to duplicate a 2D tile perfectly with perfect proportions. (Tutorial about How to duplicate a tile in perspective in another video)
This is a great skill whether you want to improve your proportion drawing skills using simple geometry. It is super easy, and it is a great preview on how learning how to sketch like the professionals works.

Step 1: Draw a Simple Square (+Name the Corners)
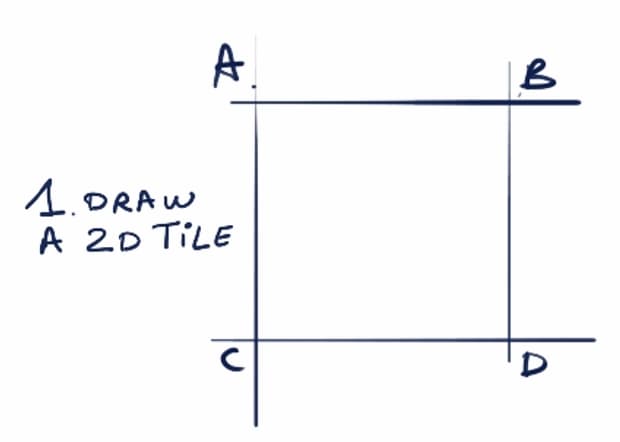
Start by drawing a simple square on your paper. After that, name each corner A, B, C, and D.
Think of it like labeling spots on a map so you don’t get lost.
Step 2: Draw the Diagonals to Find the Center
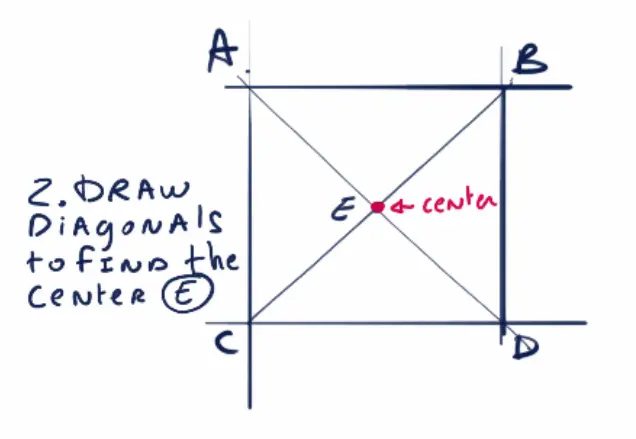
Next, draw two diagonal lines that cross inside the square: one from corner A to corner C, and the other from B to D.
The exact spot where these lines intersect in the middle of the square is called point E.
Step 3: Draw a Horizontal Line Through the Center Point
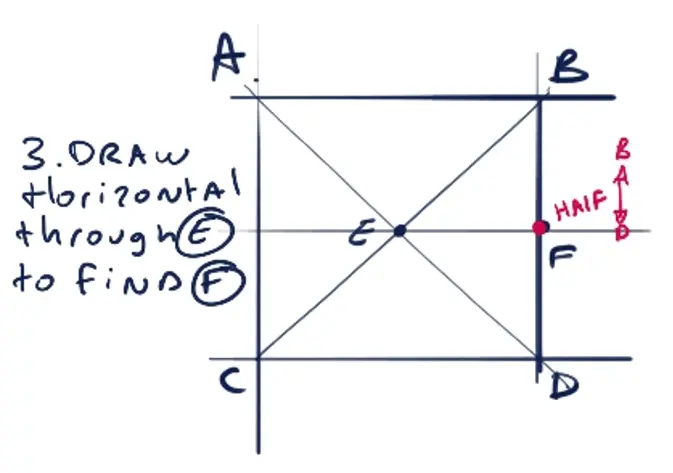
Now, draw a straight horizontal line right through point E, going from one side of the square to the other.
Where this line hits the right side of the square, mark that point and call it F.
(F is at the middle of the line B – D)
Step 4: Extend Lines to Create the Second Tile
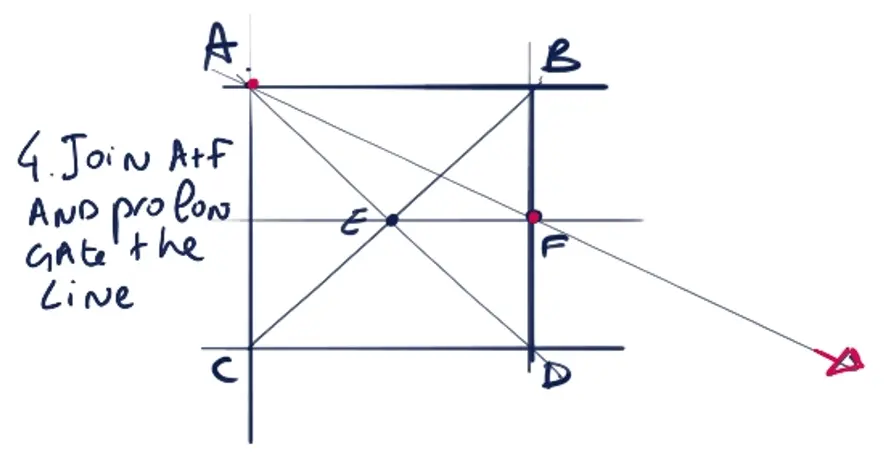
Here’s where the duplication magic happens.
Draw a line from corner A through point F and extend it beyond the edge of the square.
This sets the first corner of the next tile.
Step 6: Duplicate The Tile Distance
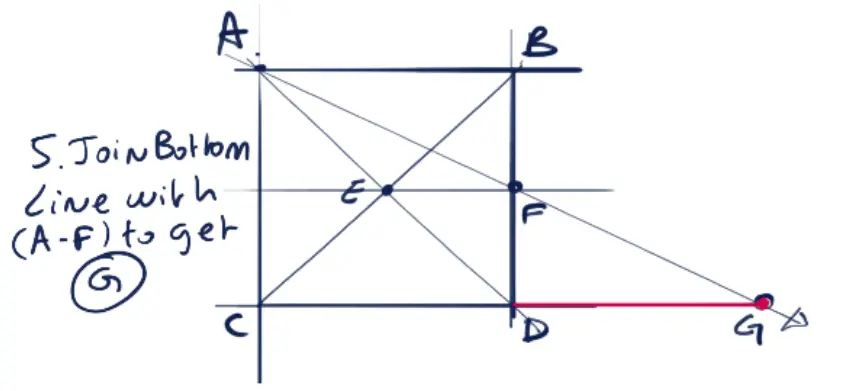
Next, extend the bottom edge line from corner C outward until it crosses the diagonal line we drew earlier.
Mark this crossing point as G.
Step 6: Connect the Dots to Complete the Duplicate Tile
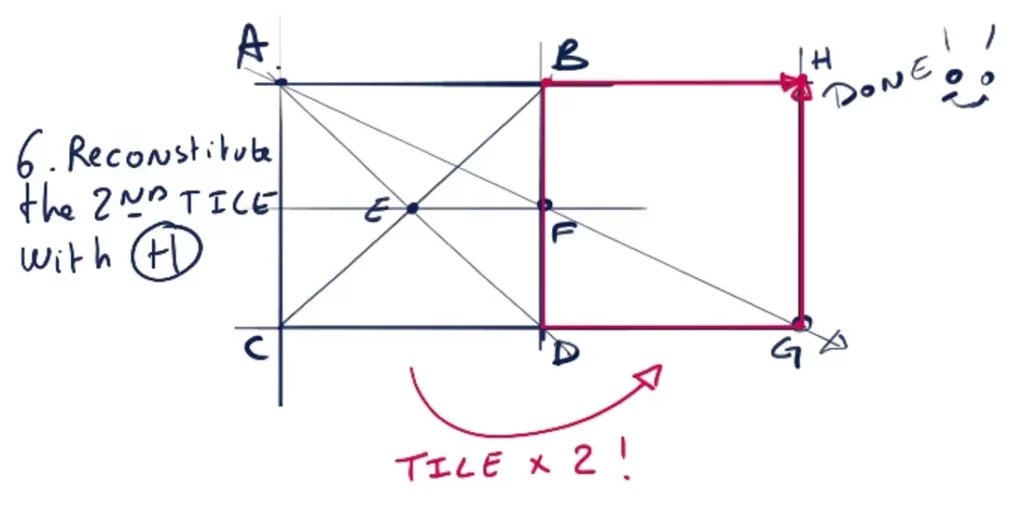
Finally, connect the new points you found by extending the lines from the first tile to the second.
This will form the next square with the exact same dimension, sitting neatly beside the first one.
Congratulations!

Congratulations, you just duplicated your first tile!
You have just level up your sense of proportion and spatial vision. 🙂
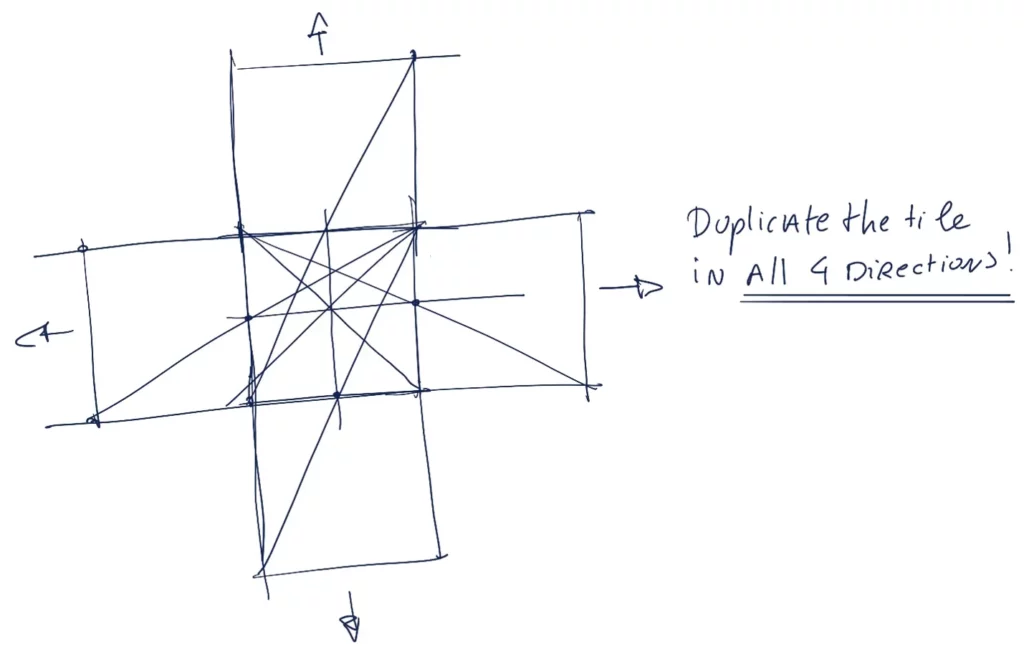
Duplicate Tiles in all 4 Directions
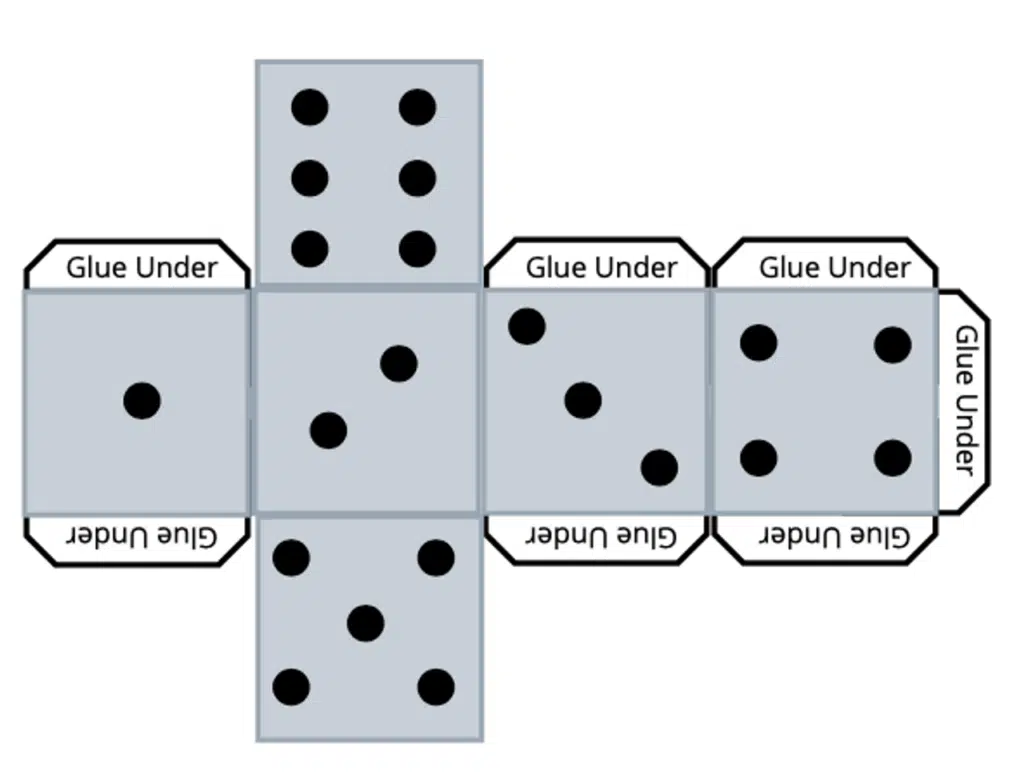
This Square Duplicating technique is applicable for all 4 directions. You can for example draw the flat layout of a dice.
Start by drawing a square and duplicate it in all directions with the same technique we saw above.
You will see, with a bit of organisation and clarity, it is very simple to accomplish!
TIP: Turn your page if necessary
Why This Is Useful for You
Learning how to duplicate a tile like this helps you keep your sketches clean and consistent. You can use this technique for any types of products, architecture, drawing a street with multiple pillars, cars when you need to draw with good proportions.
Knowing how to use simple geometric steps like this builds a solid foundation for all kinds of drawing and design. Learning how to draw from an external eye may look overwhelming, but when you start to grasp the art fundamentals or drawing, you realise that 90% of rules are basic geometry.

More than a Drawing Technique, Learn Patience and Dexterity
With this tutorial, you learn how to duplicate the tile, but you also learn about dexterity and patience. Two qualities necessary to become a great sketcher.
Practice the 6 steps tutorial to memorize until it becomes intuitive to you.
Soon, your spatial vision will improve, and you’ll be able to skip the rule (and refer to it only if something looks wrong)
For example:
If I learn how to sing, I will train first on voice techniques such as reaching various notes. Then, with practice these will become natural, and I can level up to focus on the emotion I want to convey. And if a sound seams awkward, I rework on my voice referring to the basics of singing at that moment.
The key is:
Learn and practice a technique till it become easy, so your next target will become reachable.
That’s the magic of learning step-by-step. 🙂
Practice Phases for Learning

I suggest two phases of practice:
- Phase A: UNDERSTAND
Draw the steps slowly and methodically to understand the process and memorize the sequence.
If you struggle at drawing straight lines, you can practice your lines in this easy tutorial. Or if you won’t want to, cheat by using a ruler. - Phase B: MEMORIZE
Once you know the steps, draw the complete duplication quickly to develop instinctive sketching and improve speed. Repeat the 6 steps super fast.
Tips for Beginners
- Use a ruler at first to get your lines as straight as possible. It’s a helpful shortcut while you learn.
- Take your time to go step-by-step and really understand each part before moving fast.
- Practice drawing the process slowly a few times, then try speeding up as you memorize the steps.
- Try doing this at least 10 times to build your confidence and muscle memory.
Why Geometry Is Key
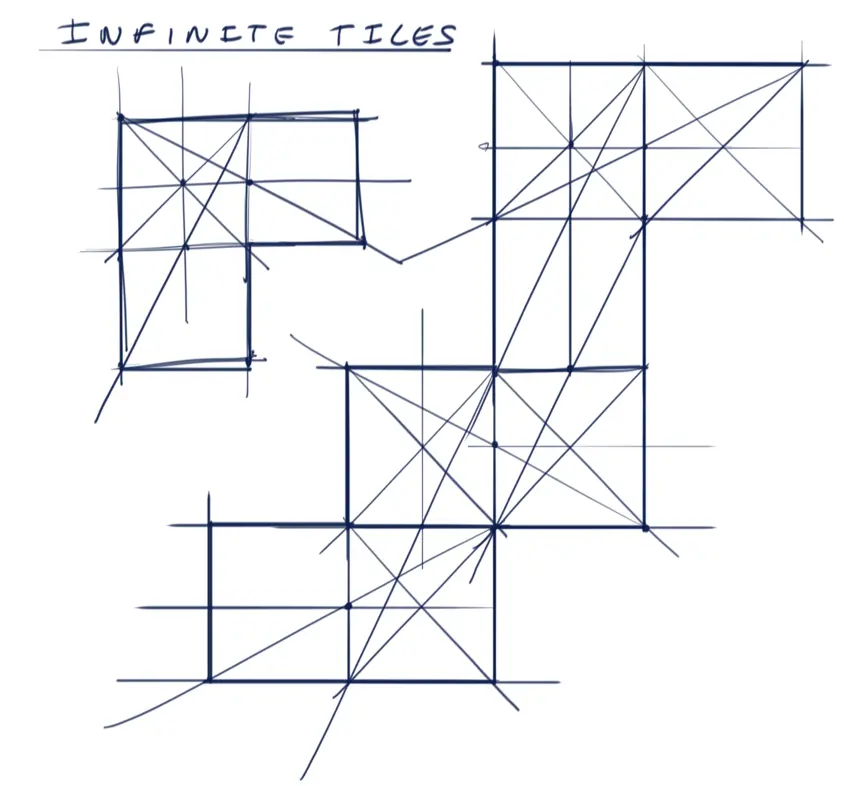
This tile duplication process is grounded in simple geometry, making it accessible and precise.
Good geometric construction ensures that the duplicated tiles align perfectly, enabling infinite repetition in any direction.
It’s a drawing skill useful for sketching patterns, textures, or architectural details.
To Explore More Drawing Cubes in Perspective!
Final Thoughts
Think of this process like building blocks on paper, piece by piece, following a logical pattern. The more you practice, the more natural it becomes, and all of a sudden, you’ll be creating dozens of perfect tiles with ease combining them like the Pixelated Snake in Nokia 3310 game!
If you want, I can also share more tutorials or answer any questions you have as you practice this.
Let me know!
Cheers,
Chou-Tac
PS: You can download the tutorial sheet below. Right click with your mouse, then Save as…
Recommended Articles
TIP 343 How to Draw 3D Objects from Imagination Using Basic Perspective
TIP 297 How to Use the Y-Axis to Sketch Product Designs in Perspective
TIP 272 How to Draw a Cube in 1-Point Perspective: Step-by-Step Tutorial
TIP 268 How to start drawing in perspective with this New drawing tool: The MICRODOT®
TIP 256 How to Draw a Cube in 2-Point Perspective: Beginner Tutorial


If that tutorial becomes too easy for you, and you want to practice your basic perspective too, you can jump on this tutorial to challenge your skills!
https://www.thedesignsketchbook.com/how-to-draw-with-an-appealing-perspective-with-the-cube-mania-challenge-part-33/