We draw together an Adidas sneaker design taking inspiration
from my working experience when I used to work there as a footwear designer.
I have prepared 16 TIPS on How to draw a sneaker for you.
Following the TIP 57 How to make your sketch stand out with a simple shadow,
I am publishing an extra video tutorial on shoe drawing.
00:04 I use a Bic Marker (for CD-DVD)
I love drawing with markers. It makes nice lines and slides smoothly on paper.
You don’t go deep into details and let your drawing expression flow.
00:07 I start sketching the last with the insole
Remember to draw the shoe in transparency. A great way to start is to draw the insole first. It helps you to better visualize the “shoe last” in perspective.
00:14 I draw the instep
To give the main shape of the last, I draw the instep. This is the curve that joins the insole to the highest point of your foot surface.
00:16 If you can draw the shoe last with success, 80% of the job is done!
Yes, 80%! The shoe last represents the proportion of your design. No matter your design, if your shoe last goes wrong, your design will look awkward.
Take the time to study, and observe a woman’s foot.
It will help you Draw the shoe last with feminity in mind.
00:28 Draw the quarter following the last
The quarter is the wider surface of your design.
It’s a good way to start giving form to your design.
00:33 Draw the medial quarter in perspective
As you see in transparency, draw the quarter from the other side to give a visual balance to your sketch. It helps to structure your perspective.
01:00 Draw the tongue taking the “instep middle line” as a reference
In design sketching, the center/middle lines are essential to use as a reference guide.
It helps you to align the shoe elements.
01:12 The main shape is done
Great! Your Adidas drawing progress!
The shoe design starts to appear pretty nice.
It is now time to spend more time on the sneaker details.
01:26 Remember to turn your paper
To draw nice and accurate lines, make sure your draw with proper posture.
A bad posture can affect years of progress if you don’t pay attention to it from the beginning.
02:11 This small line is awful. =P
What makes a sketch beautiful is its imperfection.
Even if I draw with a marker, and I can’t erase it is fine.
I will iterate pretty easily later on top of the shoe lines.
02:22 Use Hatching
To block the parts of the sneaker in a simple way, draw with hatching to represent the different materials.
02:56 Divide well the space between the lace holes
Make sure the space for the lace looks accurate. They don’t have to be perfect, but you need to draw them with a minimum of care.
03:09 Draw laces in “movement”
A drawing tip I love using on my shoes is to draw levitating props such as laces. You add dynamism to your design by adding in it some actions.
03:24 Draw a distant shadow
To make it even more dynamic, we add a shadow a few centimeters below. It gives a pretty nice sensation of lightness.
04:16 Use the Ghost drawing
To give an impression of fluidity to your lines, draw with the ghost drawing as much as you need.
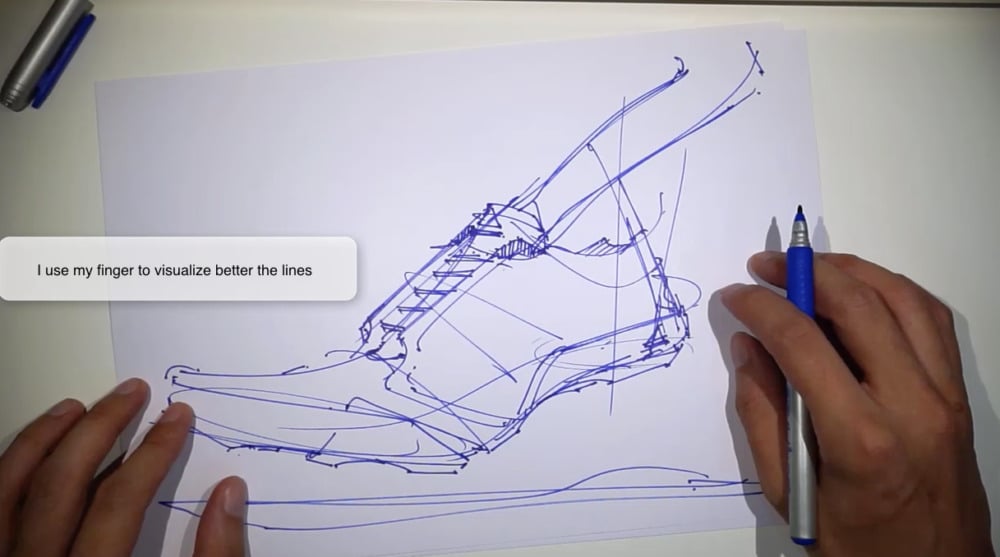
05:03 I use my finger to visualize better the lines
I visualize the invisible lines or curves with my finger.
05:47 Thank you – Hope it helps!
I hope this 16 TIPS video helps you how to draw an Adidas shoe!
You can apply all that you have learned to any sport shoe of your choice. The basic shoe drawing is the same for all. :)
What’s next?
If you are interested in sports accessories design,
I interviewed Noah Sussman.
He was a colleague of mine at Adidas, who is now working for UVEX SPORTS.
By the way,
for a super easy shoe drawing, I created a video tutorial on How to draw a Nike shoe Air Max! in 1 minute!
Let me know your impression in the comment box
See you guys for the Next TIP of the day!


[…] had fun drawing an Adidas sneaker and for the first time render the colours with […]
[…] I was chillin’ in front of my Wacom Cintiq 13HD tablet and decided to draw something on it: A sneaker design for Adidas. […]
[…] you notice the hidden 3 stripes of Adidas? I actually like it when it’s not that obvious, yet […]
Hello Tabasam,
I represented it at second 13. However I took a shortcut, as I skipped the inner line.
I apologise if I can’t see it, but where is the drawing of the sole?