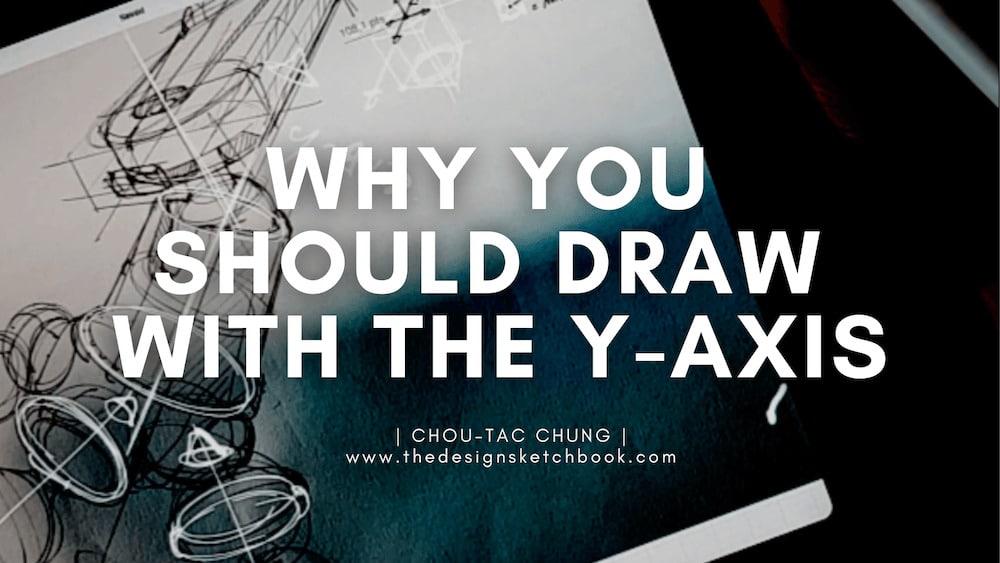
Do you struggle with product design sketching?
Draw the Y-Axis into your design process – it’s an easy way to take your sketches from flat to dynamic!
Transcription below
Hey guys,
Welcome to thedesignsketchbook.com.
How to sketch better and faster at sketching Product Design
(Drawing with Concept App)
DRAWING THE JOBY TRIPOD on Ipad
And today we get inspired by this JOBY Tripod, for our tutorial of the day: how to draw with the Y-axis.
I’m going to draw on my iPad and I’m opening the app Concepts. And we are going to import this sketch into the apps. And this is where I will give you some comments just drawing on top of the sketch.
Here we go taking the picture.
Use photos, and upload a new document. And that’s it.
So now I can draw on top of it to give you some more comments on the sketch.
Before getting started, what I like to do with the iPad is use the glove. These are specific gloves that help you to avoid palm conflict. When I draw on it, like without it, I tend to have a conflict with my palm, I tried to draw with the pencil.
So the y-axis as you can see here with an arrow, is actually what is giving helping me to look for the direction of the object when I draw it. And whenever I draw I always keep that in mind because it helps you to better see in three dimensions.
And the y-axis as you can see is actually here at the center of the small cylinder. And this is what is once again helping me to visualize it. And what you need to understand is that the y-axis is part of the tree axis like the X, the Y, and Z.
Actually, what I like to visualize is to see at the corner of the cube, it’s like I am drawing the cube right here.
Here we go. As you can see here, there are eight corners, eight corners, are actually eight opportunities to visualize x y z axis, as you can see here,
X, y, and z. Basically, the x is horizontal, the Y is vertical and the Z How deep is your object.
In another corner, the same thing XYZ, you can see that the x are both shared of the same line and the Z goes to the same direction the Y goes in the same direction as well
Another corner.
And when you draw in perspective, try to visualize x y z axis. This is what it’s going to help us, to do much faster without using all the perspective lines using the horizon line. But you need to learn from when you’re a beginner. They are all related to the basic fundamentals of perspective.
So this is why I invite you to go to the cube mania challenge and the Designer Starter Kit as well to really have this to build that vision in 3d to build that vision in perspective, which is going to become intuitive, whenever like you’re going to practice with the X, Y and Z as you can see, we go on both positive and negative directions like the Z is going towards us and further from us the X goes on the left and the right and they go to the bottom and also to the sky I would say.
Now we can also see here the tops of the phase of the cube. I really like this wheel of color from Concepts.
I invite you to make a try. Take a piece of paper Java cube and also identify this x y z axis on each of the eight corners. Take it as a game!
You can take your hand with your thumbs and your two fingers try to visualize with the x y z axis and rotate it and when you do that, try to visualize the entire cube which is turning.
Like the corner of the cube is represented by your hand.
Alright,
Let’s zoom in below.
So, for a cylinder basically, the y-axis is mostly represented by the minor axis, which is giving you the direction of the cylinder. Here we go. I like to draw the arrow with a small cone because it helped me to better visualize how in perspective it shows. And to get the x and the z-axis you need to imagine that your cylinder is inside the box.
There we go with it.
And you will get the x and the z-axis from the control lines of the top surface and bottom surface.
Basically, the contour lines are dividing this box in half and half. So you have four quarters. Do you see what I mean?
The half from the x axis the half from the z axis. See here.
Can you see the X Y Z axis appear?
So all these things are actually the… I would say the mental trick or thing that you need to visualize when you draw.
The cylinder is inside the box.
So here is the top view of this box. And remember that this y axis is at the center. So I got to draw the diagonal. And the intersection of the diagonal of the square is actually this minor axis on the cylinder, it is at the center.
It’s some basic geometry. Practice a bit and then you will get very natural to you.
Let’s carry on. So we will carry on with some more explanations of what we saw here on this cylinder right here.
So I’m doing the cylinder, but you can see here, let’s do it again. There we go. Joining the top surface – bottom surface I joined them. I draw this box. And you see that this box follows the perspective.
Here we go. And that’s how it’s going to help me to visualize this xyz axis. The contour lines of the box. Okay?
Cylinder inside the boxes.
Here we go for the axis.
So it is exactly the same thing as what I just explained to you. Here on this drawing, okay?
So this is what actually is helping me to make sure that this volume is following the same perspective of the object. As you can see that the cylinder has an extension behind it. So here is another volume like this kind of cylinder, more like a bit like a cone. It has its own y axis, it has its own direction.
Because as you can see, there’s this rotation that is moving. And you can see below some small spheres and every single sphere has its own direction its own y axis as well.
So when you Joe you need to visualize each y axis in perspective. It is going to help you to draw them. And this little arrow of the cone is actually helping me. Is it like coming forward coming on the back going on the back, and so on. This is what is helping you to visualize the space. So this tutorial is a bit intermediate. But I really invite you to make a trial.
There we go for the cone.
Let’s do another one.
So imagine that you cut this sphere in two!
Like Fruit Ninja, you cut the orange in two. And here I’m drawing the arrow and the simple trick here is that with the arrow on top, I can actually draw a cone joining the sphere.
It is actually helping me to better visualize the direction of this sphere. Of this little ball that is part of the feet of the tripod of Joby.
Let’s do something like this.
So one reminder, the minor axis is the symmetry axis as well as the ellipse. Here we go. Okay, so I invite you to make try as well to draw some squares imagine you get them into and then you draw an ellipse for it, and then you draw the cone. And then imagine that there is a box surrounding this ellipse so you can do the contour lines.
And you can get the x y z axis!
So if things get really tricky for you guys your level is a beginner. Once again I invite you to go to the Designer Starter Kit that you can download on the link below in the description and go through the Cube Mania challenge as well.
But you can find it on the blog and I will give you the link as well in the description all these we become so much easier later because it’s just like learning how to sketch is just a lot of simple rules that you just need to go through and learn step by step okay.
So here are the x y axis parallels. They are all following the same perspective.
So when you get this you will be so much more power when you draw. You will be more able to do something more complex. Okay?
There we go. I hope you have fun!
So I invite you to go to the next videos
Bye Bye!


Add comment