
1- Get inspired– Samurai mask
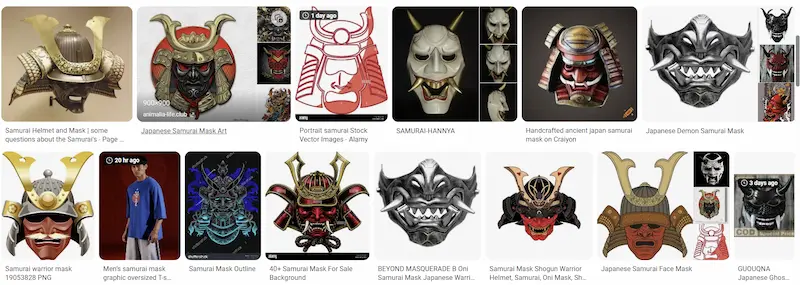
Today, I’m continuing with the theme of Japanese warriors, focusing on the fierce Samurai mask known for intimidating opponents on the battlefield. To express this, I used organic, bony, and menacing shapes to reinterpret these ancestral demons.
Spot the similarities among the masks, and see what are the most symbolic details. Pick up the inspiration you like and feel free to play with !
2- Mixing References to Innovate Your Design

I kept the “half bottom mask” to emphasize on the expression of rage, that shows sharp teeth. I exaggerated these one getting inspired by piranhas.

3- Adding Texture with Custom Photoshop Brushes
To give the mask a gritty, tactile feel, I added textures using special brushes. Regular round brushes won’t achieve this effect. If you don’t have these brushes, you can easily install Photoshop brushes by copying the .abr files to your Presets/Brushes folder, then reopening Photoshop. Feel free to look for brushes in specialized websites.

HOW TO INSTALL A PHOTOSHOP BRUSH
As soon as you got the file, you just need to copy and paste the .abr file to your Photoshop/Presets/Brushes folder. Open Photoshop, and your brush will automatically appear in your brush list !
4- Enhancing Details: Blood Spray and Background
I used a spray brush to add subtle blood stains, enhancing the aggressive vibe.


5- Quick Background
For the background, I painted with a soft brush using pen pressure opacity to help the mask pop. Cleaning up with the eraser helped increase contrast by separating the mask from the background values.

6- Clean the background with the eraser
Then I cleaned up with the eraser. I felt that the mask and the background blend in value. (Similar shade of grey) I need to get some more contrast.

7- Tone down the texture of the mask
So I partially tone down the mask texture erasing it partially, and reducing the opacity.

8- Add a pop of colour
Colour breathes life into sketches. I chose red to add intensity but found it too bloody at first. Luckily, Photoshop’s Hue/Saturation adjustment allows you to quickly test multiple colour variations. There is nothing better than colour to give life to any sketch. I decided on red, but it looks too bloody.

Change Colours Instantly with Hue/Saturation Adjustment
To change colours in a second:
- Go to Image > Adjustments > Hue/Saturation in Photoshop.
- Play with the Hue slider to shift colours dynamically.
- Experiment with saturation and lightness to find the perfect tone.
This tool lets you propose many colour options rapidly without repainting.
9- Choose your layout
The layout of your canvas is as important as your background. So don’t focus only on your sketch. Look for an interesting composition to present your sketch. Basically, I quite like using an elongated canvas.

Feel free to leave a comment !
See you guys tomorrow for the next TIP OF THE DAY.
Cheers,
Chou-Tac
Related Articles


Add comment