One of the first things I learned at my design school, as a beginner designer,
is that presentation matters in Industrial Design.
Yes, you have to convey your ideas by showing visually how a product works, how is it made, and how to use it…
but also, your sketches need to promote your ideas.
Today I show you 6 easy tips and tricks I use every day to draw better sketches and make them attractive!
Practice these 6 tips daily, and you will raise your chances of getting notified:
- at school about your projects,
- portfolio for internship/job interviews
- or design projects to present to your clients.
As an introvert, I think I am happy to “let my sketches communicate for me”! :)
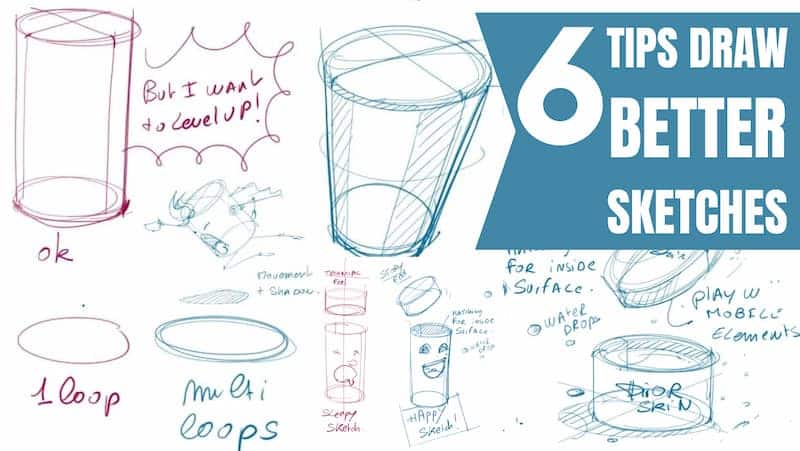
6 easy tips to draw better sketches (for beginner designers)
- TIP 1. Animate your sketches (like comics)
- TIP 2. Draw Better Sketches with Dynamic lines
- TIP 3. Master drawing the basic movements (Ellipse, circles, lines…)
- TIP 4. Draw a ground shadow
- TIP 5. Draw oblique hatching
- TIP 6. Draw Better Sketches with the "Force perspective"
- Wrap-up: How to draw better sketches!
TIP 1. Animate your sketches (like comics)
When you draw as a beginner you tend to draw the elements well aligned and neat.
We try to make a “perfect presentation”.
That’s fine, but we can draw something more appealing for your design projects.
Animate your sketches
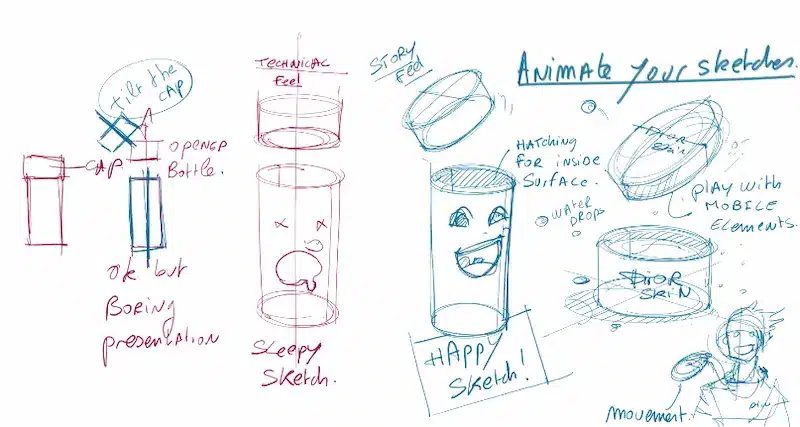
Imagine you draw a bottle (Cylinder here) that is opened.
As a beginner, we often choose a classic and boring presentation
that shows the cap aligned with the bottle itself.
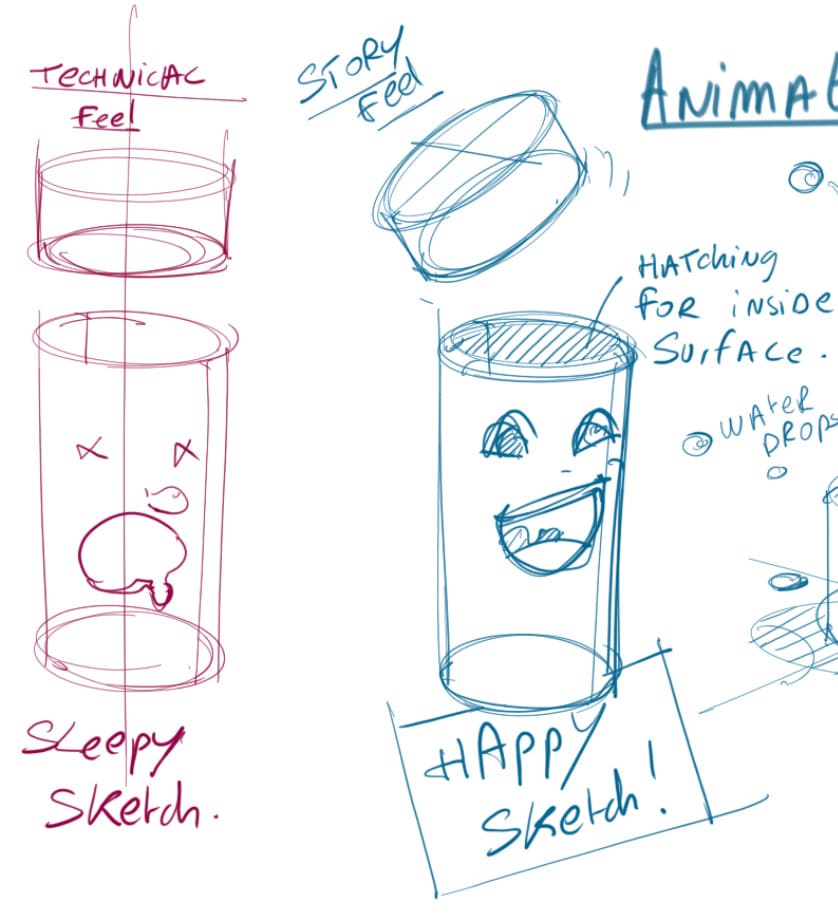
TIP: Add hatching inside the bottle
I added the hatching for the inside surface to create more contrast.
However, what we wanted to do was to make it more interesting,
so we decided to tilt the cap position.
By doing so, you get a sketch that is more lively, and more dynamic like how comic artists do!
Before it was a pretty “sleepy sketch”.
The other one is more like a “happy sketch”
When you draw your sketches, try to get a “happy presentation”.
It makes your product much more interesting.
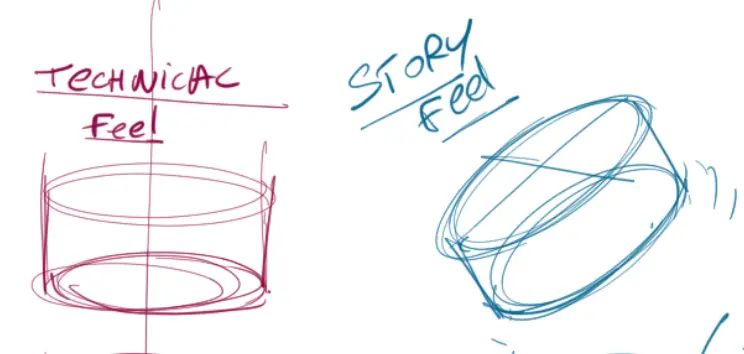
The left cylinder is more of a technical feel.
The right cylinder with the tilted cap has a story feel
Let’s draw a skin care product from Dior: “DIOR SKIN”.
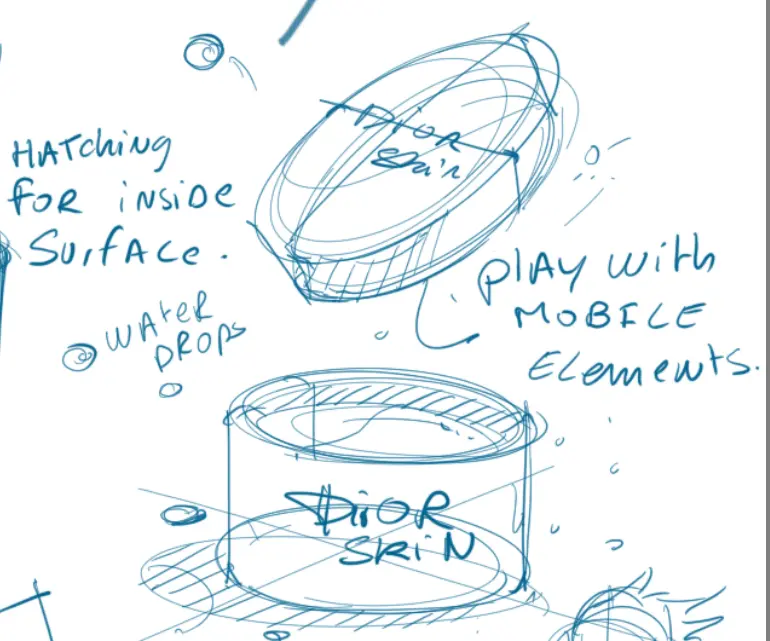
You feel there’s a movement,
there is something more like animation, more like comics
Play with the mobile elements
of your product.
For example, if you draw a person with a pendant,
make the pendant levitate to attract attention on it.
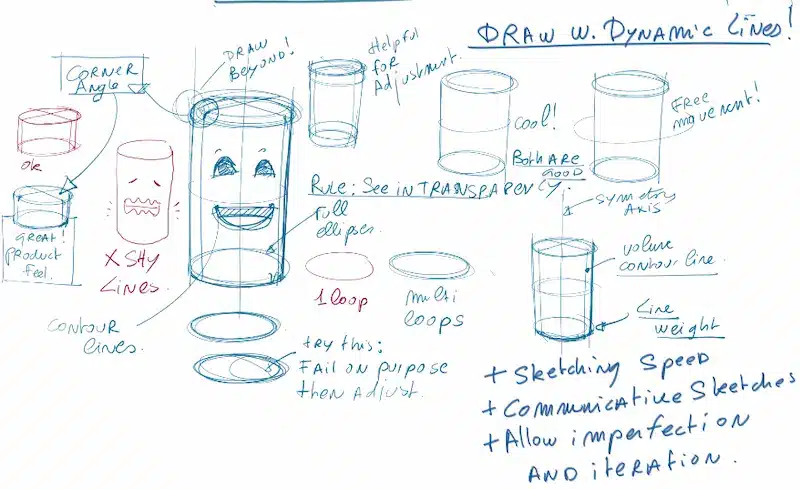
TIP 2. Draw Better Sketches with Dynamic lines
When we start sketching as a beginner, we often make this mistake:
Draw a product with the contour only. Because we are pretty beginners we don’t know how to draw.
Lines are pretty shy.
While in product design what you need to do
is to see things in transparency
Ellipse

Sketching Tip 1: Draw dynamic lines
You have to imagine your cylinder transparent.
We draw the full ellipses.
Remember the rule to sketch like a Designer is: See in transparency
So we will really apprehend things in 3 dimensions.
When I draw my ellipses, I draw them dynamically.
Don’t draw the ellipse with just one loop.
Draw with multiple loops.
So you can gain some momentum
when you are drawing with your ellipses
Okay?
So the top ellipse and the bottom ellipse of the cylinder
are going to be drawn with multi-loops.
Sketching Tip 2
Exaggerate the number of loops
when you are training.
Sketching Tip 3
Start by failing your ellipse on purpose.
Then you carry on and you adjust it.
The elliptical movement will gain momentum and become smooth.
Straight lines
For the straight lines, I do not hesitate to draw beyond.
I draw beyond what I need
It is really helpful for adjustment
That’s what we want to do in product design sketching.
Contour lines
You add also some contour lines
that’s pretty efficient for drawing in 3 dimensions
You have the contour line
that is fitting the cylinder
or even more, like having “free movement”.
Give more dynamics to your gesture
Okay?
Sketching process
When I drew this cylinder I also added a symmetry axis
I added some contour lines and line weights as well.
That’s my common process of having some dynamic sketches.
Okay?
Plus, I added here on the corner a very smooth angle.
A common mistake is to have this corner of the cylinder very sharp.
Add this little round corner, and you will add a touch of realism to your product drawing.
Okay?
Once again, what we want is to create ” happy sketches”
Something that is more lively, so you need to draw with dynamic lines.
Benefits of dynamic lines
The benefits are:
- you gain sketching speed
- your drawings get more communicative
- you don’t look for perfection and you want to iterate on top of your sketches fast
TIP 3. Master drawing the basic movements (Ellipse, circles, lines…)
Most beginners fail at drawing not because of a lack of talent, but because of a bad drawing posture.
I teach you step-by-step these basic movements in the Designer Starter Kit:
You will find tutorials on “How to master your basic gesture” and also How to draw basic perspective.
You will see how to draw with the ghost drawing.
How you can draw with momentum by drawing with your full arm, from shoulder, elbow, wrist to fingers.
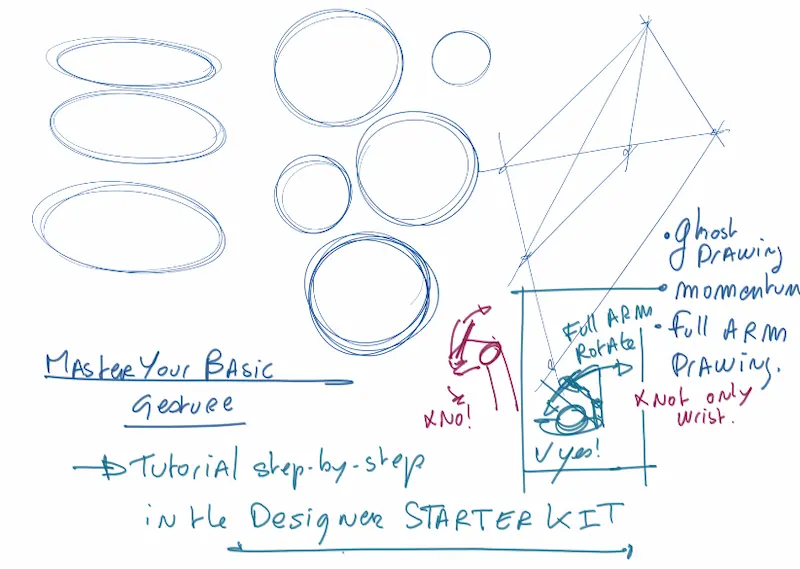
Tip 3: Draw with your full arm
If you want to draw as a product designer you need to master the basic shapes:
TIP 4. Draw a ground shadow
To add more realism and interest to your product design,
we cover here 3 types of shadow:
- the static,
- the levitating shadow,
- and the one in movement!

Sketching TIP 4 Draw the ground shadow
Stability shadow
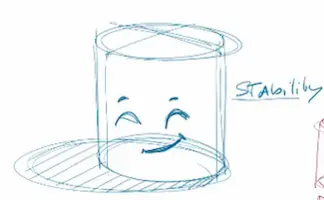
A very simple tip to draw your cylinder with more realism
is to add a ground shadow. It adds some stability.
Without shadow, it is a kind of “feeling lost”.
You don’t really know where it belongs.
Dahlsim shadow
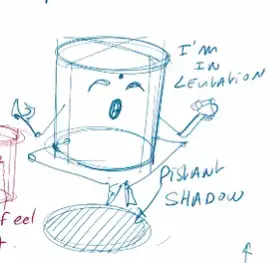
Let’s carry on by drawing a ground shadow
but it is more distant. It looks like levitating.
Let’s carry on here, so I’m going to draw another cylinder
but this one is tilted.
Superman shadow
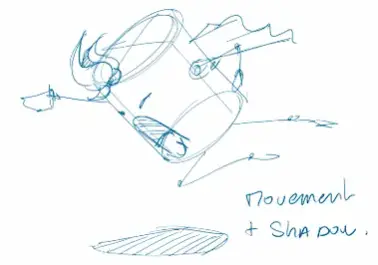
Remember the Tip 1?
You can tilt your products and the props.
You can draw the ground shadow that is distant below it
and it really gives some more dynamism and movement.
Doodle practice time
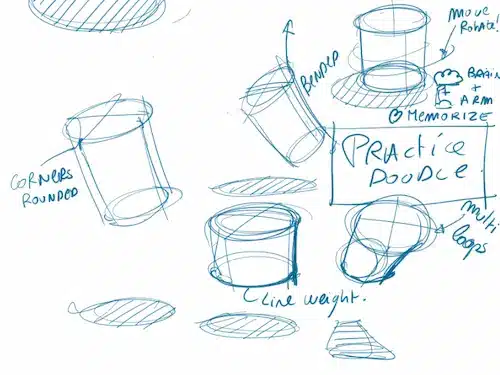
Train with many simple little cylinders by doodling
many many of them with their respective ground shadow.
TIP: How to Learn Faster How to Draw
When you learn some new tricks, and some new tips,u003cbru003ehave a practice doodle time. u003cbru003eIf you don’t, there is a high chance you will forget about these tips soon.
It just takes a few minutes to draw better sketches.
But it really helps your brain to memorize long-term drawing techniques.
All this will help you to memorize for your brain
but also your arm, because your arm
also has a memory of form.
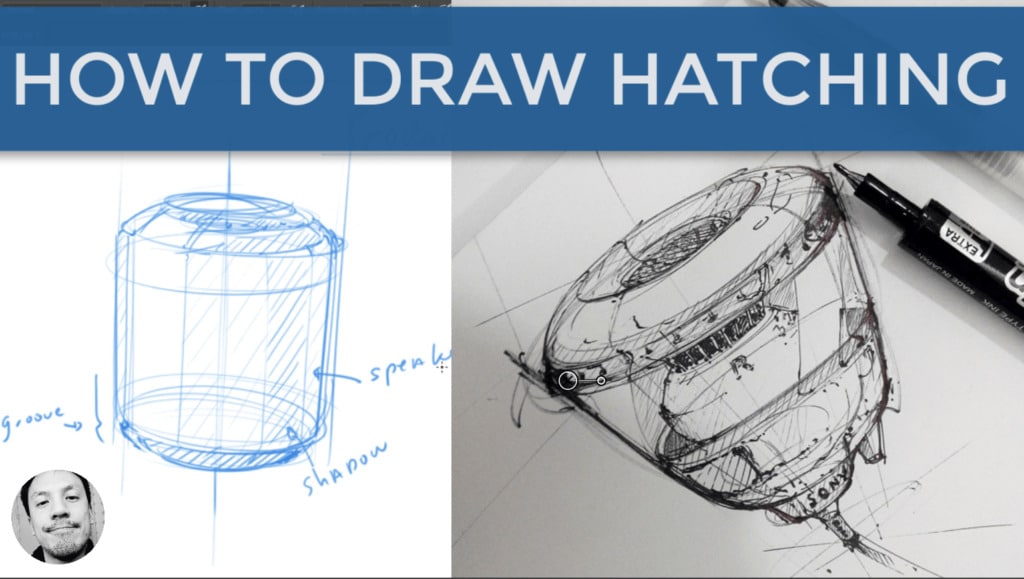
TIP 5. Draw oblique hatching
In product design, we want to draw with speed, you want to be efficient.
Hatching will definitely speed up your sketching process.
The faster you can draw your ideas, the more ideas you can come up.
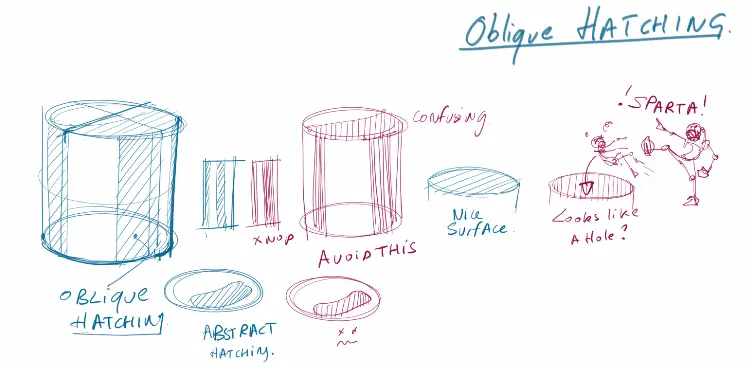
TIP 5 Draw hatching
To draw volume, we draw hatching.
You start to draw the delimitation, the zone of shadow
and you add oblique hatching.
Avoid vertical hatching here
except for certain particular situations.
For example,
the top of the red cylinder looks like a hole.
Right?
When you draw the vertical hatching/lines
it reminds me of the scene of “Sparta” (movie: 300).

He kicks the enemy with his front foot
and makes it fall into the giant hole.
Draw oblique hatching for all your ID sketches (Industrial design sketches)
TIP 6. Draw Better Sketches with the “Force perspective”
First of all, congrats for arriving at this stage of the video.
You practice your sketching tips with cylinders.
You reached that level but you still want to level up?
To get some more attractive sketches for product designers is to force
the perspective.
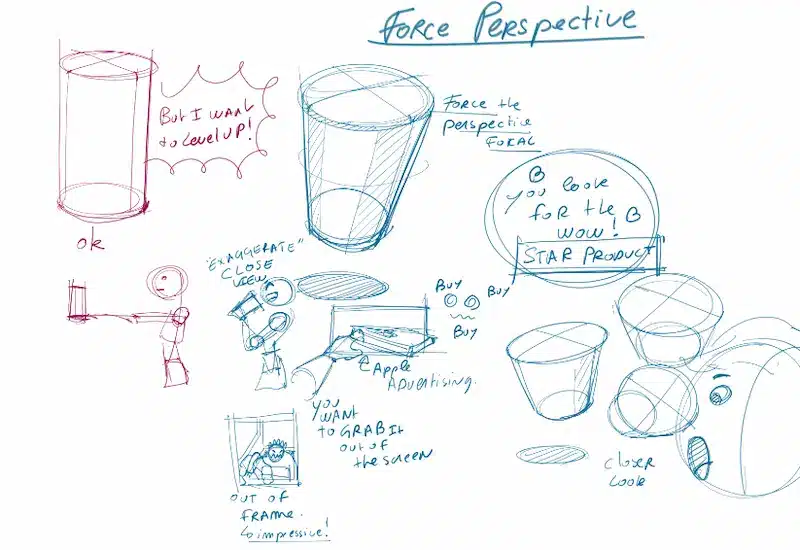
TIP 6 Force perspective
You play with the focal of the camera
On the left, it’s like the cylinder is very far away from the viewer
like if you’re holding it in front of you.
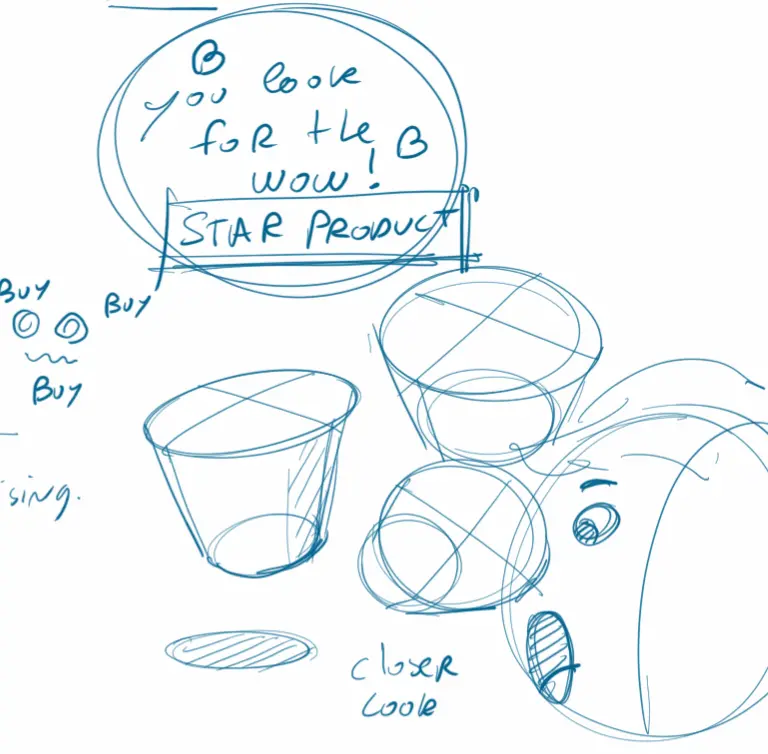
Your sketches
need to be informative
but they need to be also attractive.
Practice Doodle Time!
So here’s your Practice doodle time!
Draw your cylinder from a different perspective
and try to play with it like the bottom ellipse is much smaller.
So you have an exaggeration of the top of it
like it’s just in front of you.
Okay?
It’s like if people could grab the product that
you are drawing.
You want people to grab it
out of the screen or your paper.
Wrap-up: How to draw better sketches!
It’s time to wrap up and assimilate the 6 sketching tips for beginner designers
So the first one is “A”: Animate your sketches
You will make sketches that have a lot more energy.
Then the “B”: Draw with dynamic lines
Beginner drawings are pretty shy
and you need to dare to draw and use your courage
to draw much more dynamically!
On “C”: you need to master your basic gesture.
Learn step-by-step in the Designer Starter Kit.
You will start making baby steps and soon take the rocket
and progress so much faster at an exponential level when you know
your basics.
Okay?
For the next one “D”: Add ground shadow
and as you can see here, it looks stable
or having the levitation.
For the “E”: Draw oblique hatching
Draw super fast and avoid the “Sparta” effect
And for the “F”: Force perspective
You want to impress and seduce your audience!
All right?
You want to catch people’s attention (Designers, marketing team, investors, teachers…)
Drawing to communicate and better promote your ideas matters as a product designer.
No matter how informative your sketches are,
if nobody looks at them, it is missing the opportunity.
So remember, one of the secrets of sketching as a product designer
is to create and present a “Start Product”

![How to Draw Realistic Products with "GROOVES" [Beginners]](https://www.thedesignsketchbook.com/wp-content/uploads/2025/04/How-to-Draw-Realistic-Grooves-in-Product-Design-Sketches-Step-by-Step-for-Beginners-Cover-1000.jpg)


[…] Acknowledge and celebrate every improvement, no matter how small.Recognizing your growth boosts your resilience and helps you face criticism boldly. […]