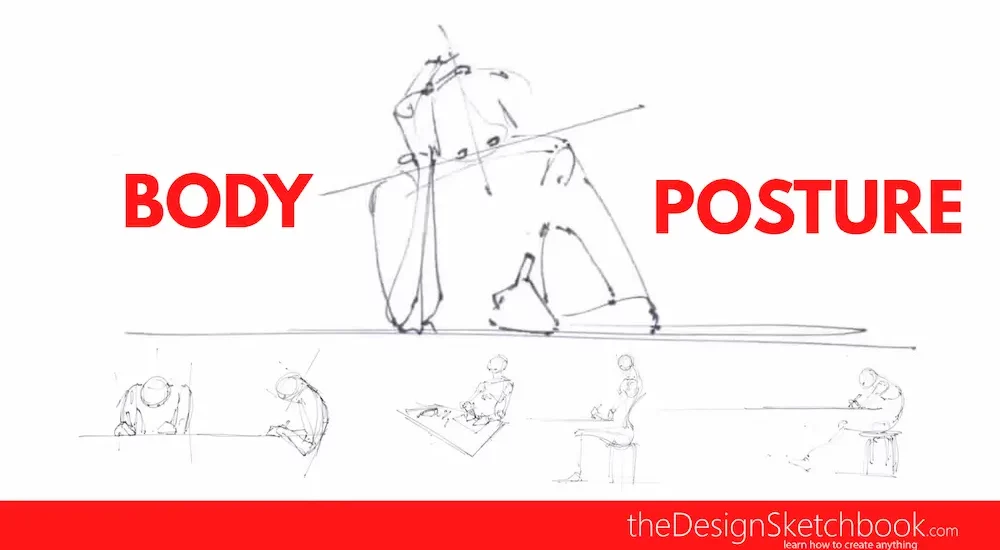
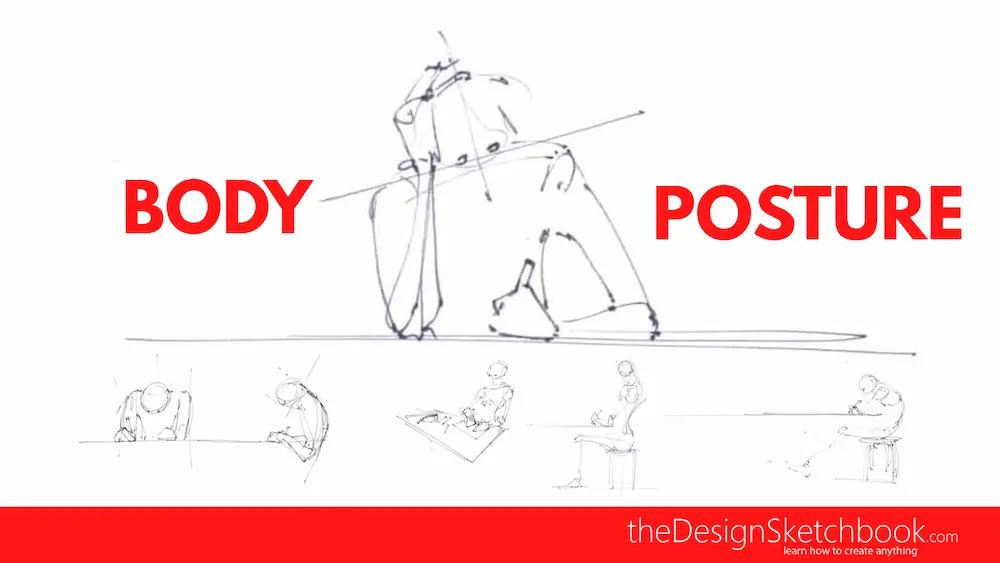
Drawing Posture is essential for drawing, but too often neglected by beginners and even professionals.
Just like playing sports or the piano,
when you’re drawing you need to pay attention
to the body position for drawing, especially the hands, elbows, and fingers.
Most people don’t realize it,
but good posture allows you to draw faster,
draw more precisely, and for longer periods of time.
You can always draw with bad posture, and maybe you can even draw well.
But if you start out with good posture it will eventually become an automatic habit
that you fall into without any extra thought or effort.
Thanks to a solid basis,
your drawing skill level will rise more rapidly,
and your sketches will be both more beautiful and your lines more expressive.
Let’s compare good postures with bad ones.
A. Good drawing posture means:
- Working for long hours with little fatigue
- Producing a balanced quality of drawing throughout the entire session
- Preserving your concentration
- Mastering your sketching
- Drawing faster
- Keeping your entire drawing and work pace in view
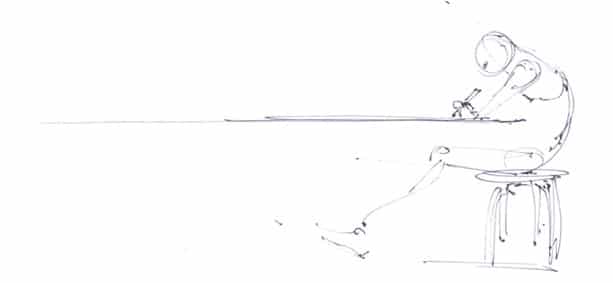
GOOD POSTURE 1. A proper posture is stable
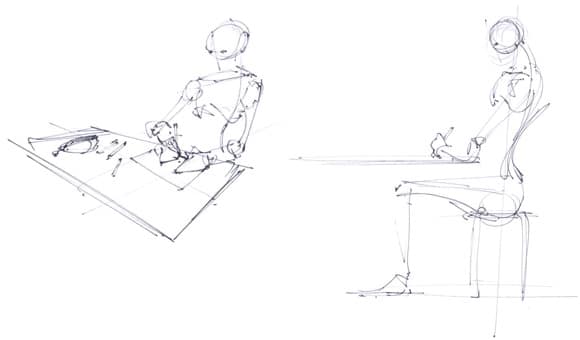
Straighten your back, then lift your head up and lean it slightly forwards.
This gives you a complete and clear view of the entirety of your work zone
(which includes your paper and other materials like pencils and markers).
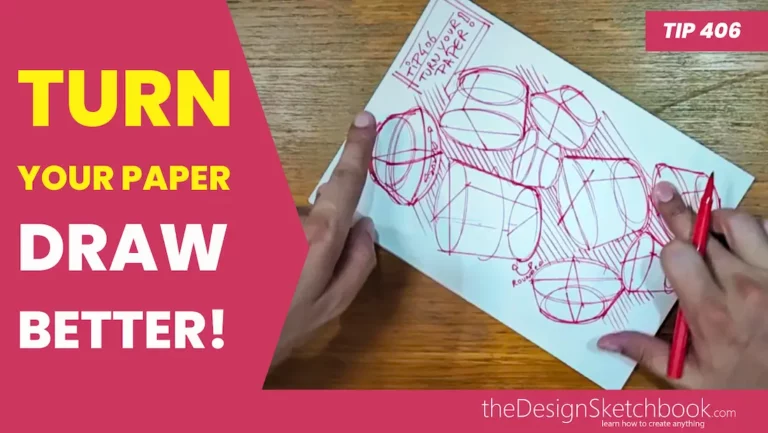
GOOD POSTURE 2. Rotate your paper. Not your body!
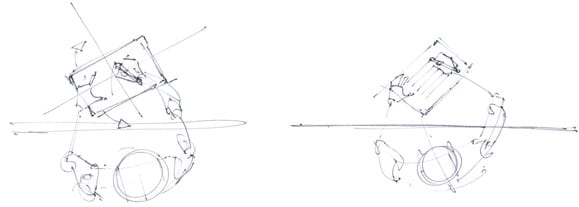
It’s not uncommon to turn a page 200 times in one session at the drawing table.
When just starting out people tend to draw using the dominant hand’s wrist as their main axis of movement.
In an effort to draw properly, beginners will keep their paper very straight and fixed on the table, perfectly lined up in front of themselves.
Then, to sketch difficult curves, they attempt some pretty impressive contortions around the (still unmoving) paper. It’s useless if valiant effort, like all the strange poses in the world, doesn’t allow you to draw as freely and smoothly as simply angling the paper. It may seem like a simple solution, but sometimes simple works best.
Try it yourself
Place the hand holding the paper steady at the top left corner of the paper.
While the drawing hand holding the pencil moves, the drawing hand constantly and lightly brushes along the paper in order to steady itself*.
Enhance the movement of your wrist by using your elbow and shoulder.
For the really large strokes, your chest can come forward and back slightly as well.
 * You will find more details and some practical exercises in the posts dedicated to drawing straight lines without a ruler and sketching curves without the aid of a French Curve (a drafting tool designed for tracing curves).
Bad drawing posture means:
- Is bad for the neck, back, and wrists.
- Invites fatigue.
- Can cause shadows to fall on your work.
- Hurts concentration and perseverance.
- Causes a skewed perspective.
BAD POSTURE 3. One arm “fencing off” the drawing zone
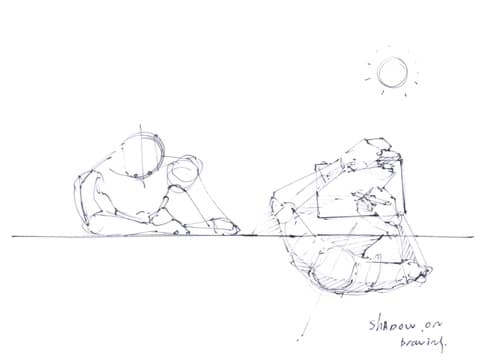
A leaning the body on the table with one arm “fencing off” the drawing zone.
Sometimes we choose this position in an attempt to concentrate better.
Instead, we end up with the opposite effect.
The upper body has a limited range of motion, and thus all movements are limited.
The arm that encircles the paper can also create an undesirable shadow over your work.
Try it yourself:
Open your arms to free the work surface and welcome the available light. Your brain will also become more open and creative. A bigger clear space will make your paper appear smaller. In turn, you will dare to draw bigger.
BAD POSTURE 4. One arm as a pillow
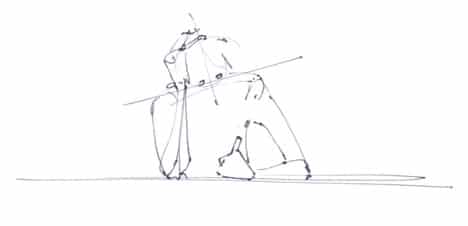
Like the previous example, here’s another bad posture where the elbow rests on the table. Here, the head is propped on the non-dominant hand, which is thus rendered useless (except as a pillow).
You cannot use your hand to turn your paper while you draw.
BAD POSTURE 5. Putting the head down or snoozing on the table
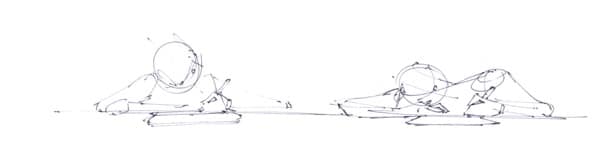
Due to fatigue, you’re lowering your head more and more,
dooming your range of motion to become increasingly restricted.
As this happens, your drawings get progressively smaller.
You lose the correct angle from which to view your drawing and tend to slow yourself down by focusing too much on details. With your neck at an unnatural angle, you’ll get a skewed vision of your drawing.
Try it yourself:
Slouch down and lean your head on a folded arm. Then, draw a circle. Sit up again and you’ll find that you’ve drawn a terribly wonky circle that looks like it might actually be a strange sort of ellipse.
BAD POSTURE 6. An untidy or overloaded desk?

In these situations, the elbows and the shoulders position are sometimes held too close to the body.
Wider, grander strokes are lost, and the drawings shrink as the body tenses.
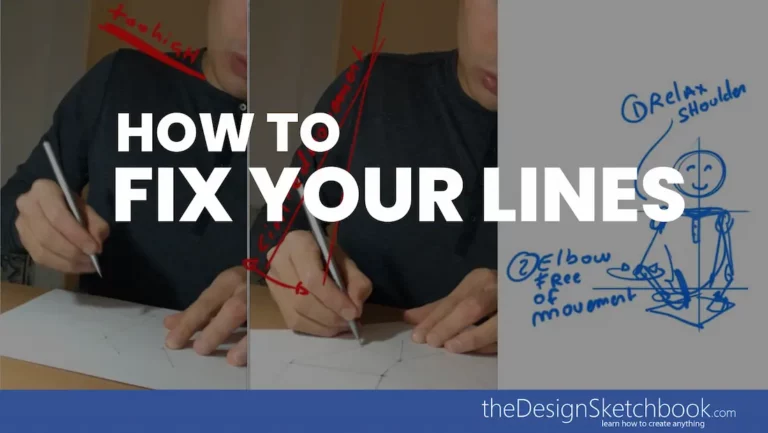
BAD POSTURE 7. Check your chair and table height!
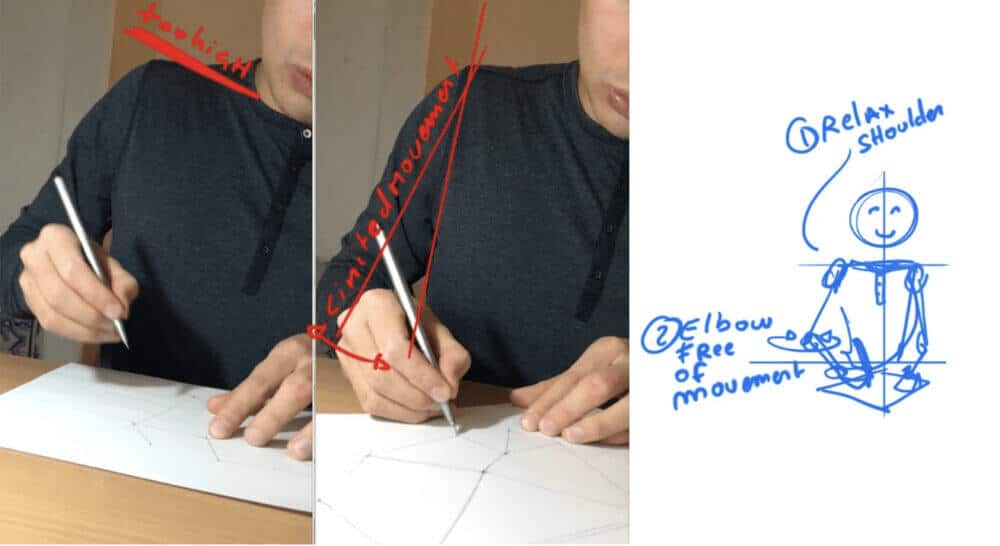
On the right, you can see how the elbow is free of movement. You will be able to draw quality lines and sketches.
To practice, I show you video tutorials on how to draw freehand:
TIP: Keep your workstation clear
A drawing area is not for storing materials.
If possible, plan a shelf for storing things like your pencils, markers, and books.
POSTURE 8. The entire body is too relaxed
If you don’t pay attention you’ll risk falling into this position without even realizing it.
The back bends, the head bows, and the legs lose their supportive stance.
After several hours of drawing, the body really just was to chill out and relax.
However, the more you relax the more your effectiveness will be compromised.
Once you really relax, it’s hard to get back into a good posture.
TRY IT YOURSELF:
If you know you’ll be working long hours, plan regular breaks and include some simple stretches. It will allow you to keep a constant and high potential for effectiveness.
Conclusion
This list of body postures covers the main guideline to start today!
The point is to illustrate the importance of good posture while drawing.
Practice them consciously, to begin with.
Soon these postures will simply become natural.
You will adopt them to your drawing routine for all your life!
LEARN MORE ABOUT DRAWING FOR BEGINNERS


Really love how you explain everything in such a clear way
Thank you so much for your feedback.
I will keep up!
Great tips on maintaining proper posture while drawing! I never realized how much my body position could affect my artwork. I’m definitely going to incorporate these suggestions into my practice. Thanks for sharing!
Hi! Thanks for the article. Do you have any recommendations on how to keep good posture while drawing outside (sitting on the grass, in a chair, etc.)? Thank you!
Hello Marcela,
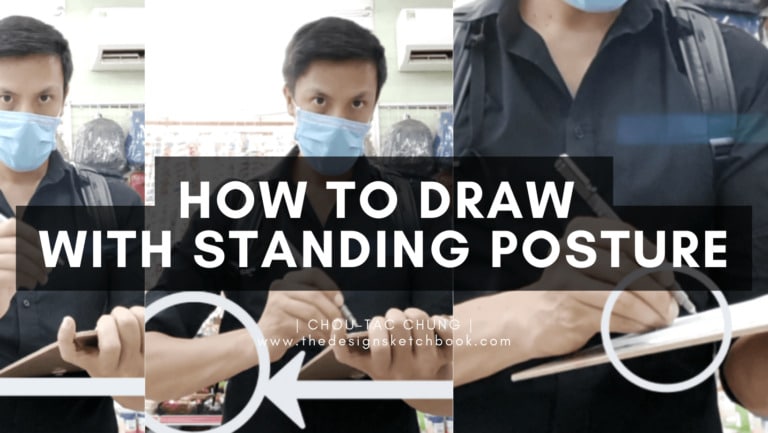
A Tip I could give if you draw standing holding your sketchbook is to hold it with your left hand (if you are right-handed) and keep your elbow against you – so you will gain stability.
Chou-Tac
I actually think this should be compulsory to teach in art lessons/schools. I’m a bit miffed to be honest, because obviously as a teenager or kid you’re not really going to think about stuff like this are you…and bad posture can affect you so much in later life… :/ I just wish someone had taught me this when I was younger
And sorry where are my manners; thank you for this
Hello Hilary,
I do also agree on how the basics are not taught in school, and without the right information it can be harmful.
It is the same thing for drawing basic straight lines, circles or ellipses. They are worth taking the time to practice them in the right position and movement. As they will affect every single sketch of the journey.
I like to compare the practice of sport and drawing as they are both about repetitive body movement.
You may look for adjustable chair and table to custom your optimal body position to draw. Ikea have good products for that. : )
That is my favourite configuration : https://www.thedesignsketchbook.com/how-much-it-cost-me-at-ikea-to-install-the-wacom-cintiq-22hd/
Hello so sorry didn’t even realise you had replied! Thankyou so much for your advice and response it really is appreciated:’)
I would do anything to go back in time and have just adopted this posture to begin with. I’m so used to getting my head as close to the paper as possible now…I work out now though and my posture has improved so much ( I wasn’t fat like I thought I just needed to improve my posture and back muscles! ) but god I can’t draw like what I used to!! I built the habit of drawing just ridiculously leant over when I was teaching myself, so as much as i’m sure this posture will help overall, I am currently finding it quite a challenge to draw whilst in it… I won’t give up though as I want a decent HEALTHY body and to be able to draw as well! Not to mention it actually HURTS when I try to lean over now! Healthy posture really is so important
Hi mr.Chou,
I am preparing for common entrance exam for design. I am passionate about industrial design, especially product design. Currently I follow your tips and book with the help of an art teacher. She tells me that I should not rotate the paper according to my convenience. So that I should also learn my difficult strokes. but when I refered different product design books, I found that I need to rotate the book according to my convenience whenever needed.Output only matters. I would like to have your valuable advice regarding it..
Thanks .
Hello Krishna,
First of all, any teacher who will give you advice want your best – and they are definitely valuable.
I see what you mean when you struggle wondering what advice to follow and form who.
To make up your mind, ask yourself what is the background of the teacher. Don’t get me wrong, it’s not about good or not, but how different it is. Maybe your art teacher is referring to draw on Canvas ? So you can’t rotate it ?!
I don’t know, but it maybe a beginning of an answer. What I mean is his technique may be relavant but for you the context may be different.
In product design, we look for productivity. So we need to throw the lines fast and efficient. (Like you could draw napkin sketches in front of a client) The best way to do so is to rotate the paper so you can draw with a “natural” way of movement of your arm. We like to make things easier, faster and smoother.
Hope it helps !
Cheers,
Chou-Tac
PS: Feel free to try her way as well ! As if you use a Wacom Intuos Graphic tablet, you can’t rotate it. On this case, it’s relevant hehe. (I personally prefer Wacom Cintiq tablet though – They are screen tablet and they give similar sensation to paper that most of them can rotate)
Hi Mr.Chou,
Thanks a lot for your advice ,It means a lot. I found out that in our context,its better to rotate page.Although we can master the difficult strokes without rotating paper, It takes time for practice. But I am getting hang of the ghost drawing technique.
I feel like kissing the paper with pen lightly.. much more fluidly .
I currently use a wacom graphire tablet(ancient) which was donated by one of my seniors.I cannot afford cintiq right now.I am planning to buy an intous now.But once I get into design college, I dream to use the one in labs.
January 2017 is a crucial month for me , I have the ceed exam.
Keep posting these tips,sir. Keep motivating us. Wish you a happy new year!!
Thanks,
Krishna
Hello Krishna,
You don’t have to get an Wacom Intuos tablet if you already have the Graphire one. I also started with the Graphire, and there is no much difference !
Ok, the spec sheet will tell you there will be so much more pressure sensitivity, but I personally never really feel the difference as the Graphire is already so good.
The only reason you could upgrade, is to get a bigger format (and sweet nib made of felt.) 🙂
Cheers,
Chou-Tac
Hi Mr.Chou,
Yeah, you are right,chou.I personally liked graphire than intuos because eventhough the active area is less I find it comfortable with graphire.I am basically a left handed, So I kind of use my right hand for mouse(zoom) and left for drawing. I used intous 3 (one of my juniors) recently, It comes with buttons but I mainly use my mouse to do that job.The felt tip nib is good, but I don’t mind drawing with graphire pen. I would like to share some of the drawing that I have drawn with graphire tablet.I mainly use illustrator, sketchbook and photoshop. I saw your latest post.It means a lot to me.
Thanks
Krishna
I used this for my students in art class and it helped a lot. High school students have very poor habits and introducing this has really improved their work.
That’s true. It’s not that easy to change habits, especially for something that we tend to underestimate or that we are not even aware of. It’s great that your students have increased there level seeing positive results. It definitely motivates to change.
Hi Mr. Chou. I frequently draw on bed and I live in a small room without a table, like in a tiny boxy kitchen. I cannot afford a table so since i sketch on bed, can you tell me or illustrate what sort of posture is good for sketching on the bed? Thank you so much. Your first guide was an eye opener. I just find myself stiffening up so need to work on that but posture is a huge issue for me. Please help, advise and thanks a lot 🙂
Hello Abhishek,
You may consider having some sketching session outside. Maybe in a library, a caffe… ?
Otherwise you may consider getting this. The height is adjustable.
http://www.alibaba.com/product-detail/ALS-A009-CE-ISO-approved-adjustable_60229968098.html
So your bed will be your seat.
Hope it helps :).
Cheers,
Chou-Tac
Hi again. Thanks for replying to me. That does help but I was looking into it but will a poortable table do especially if i sketch on wacom pen n touch tablet (I have one acctually)
http://www.amazon.in/gp/aw/d/B015OFYO48/ref=mp_s_a_1_4?qid=1460362999&sr=8-4&pi=AC_SX118_SY170_FMwebp_QL65&keywords=portable+table&dpPl=1&dpID=41tiILPZ8JL&ref=plSrch#immersive-view_1460363045032
Nice article.